Free Intermediate Crochet Shawl Pattern
Hello my maker friend! It has been a minute since I posted a new pattern so today I am sharing with you an intermediate crochet shawl pattern – the Wanderer Shawl.
I took a break from crocheting and designing to dive in a bit deeper to other things that sparked joy and inspiration. Since my last post – around a year ago, oh gosh – I traveled all around and visited my family multiple times in Hawaii.
The time spent exploring and reconnecting with my family inspired me so much to start finding balance in my life again. Now, I am back fuelled with more ideas and a creative burst!
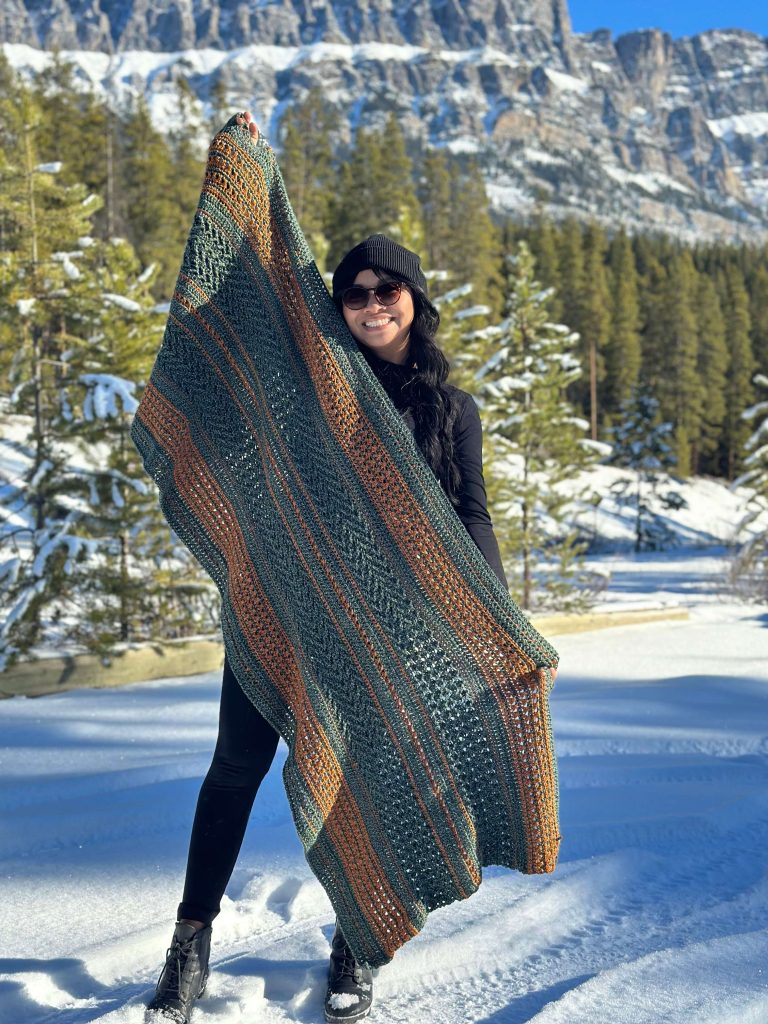
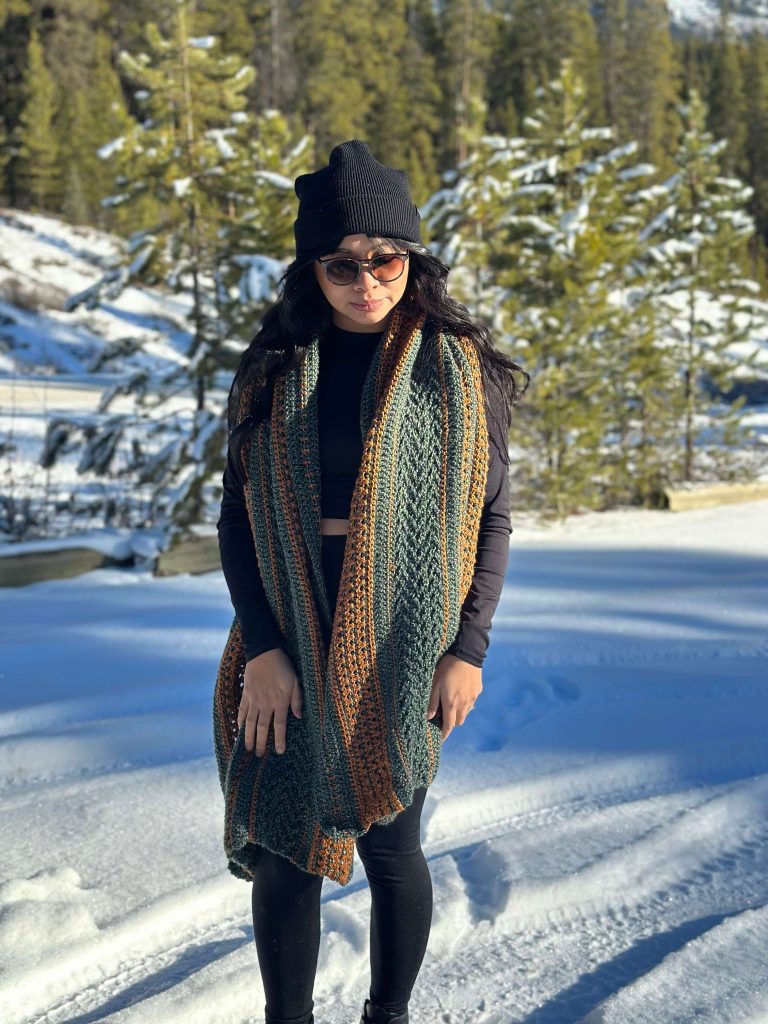
My first design of 2025 – and since taking my long break – is this beautiful large crocheted shawl which I named the Wanderer Shawl to give tribute to all of the adventures I went on while on break.
Inspiration for this modern crochet shawl pattern
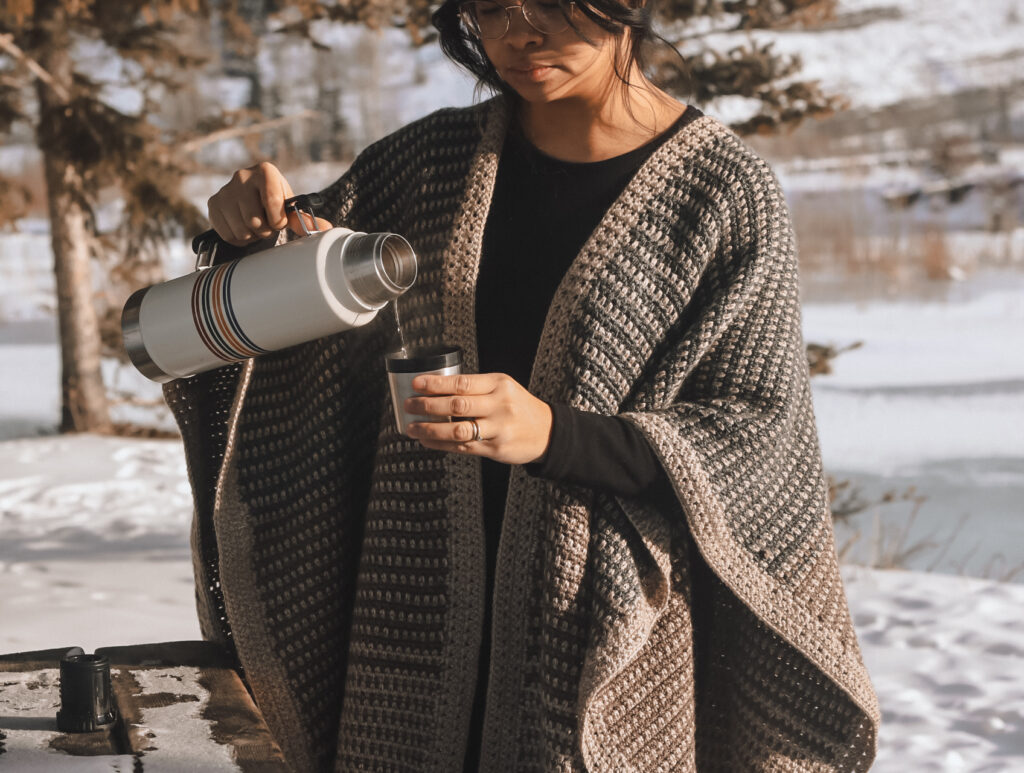
When I designed this intermediate crochet shawl pattern, I had summer nights by the lake and a fire pit in mind. We are huge fans of camping during the summertime and spending our days near alpine lakes. This summer, I am actually putting together a collection of camping sweaters too!
I documented making the shawl from start to finish, watch the vlog here:
Construction of The Wanderer Shawl
This is rated an intermediate crochet shawl pattern due to the stitches used as they may require more attention to attend to. However, the repetition after nailing the stitches and the use of basic stitches makes this pattern advanced beginner friendly.
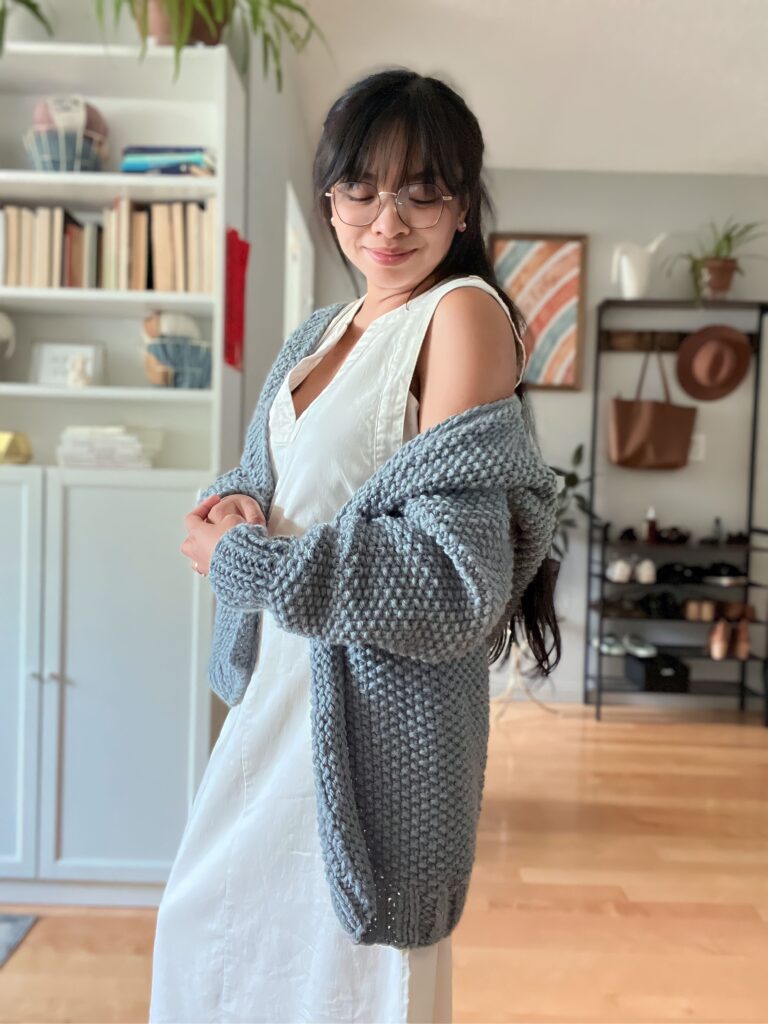
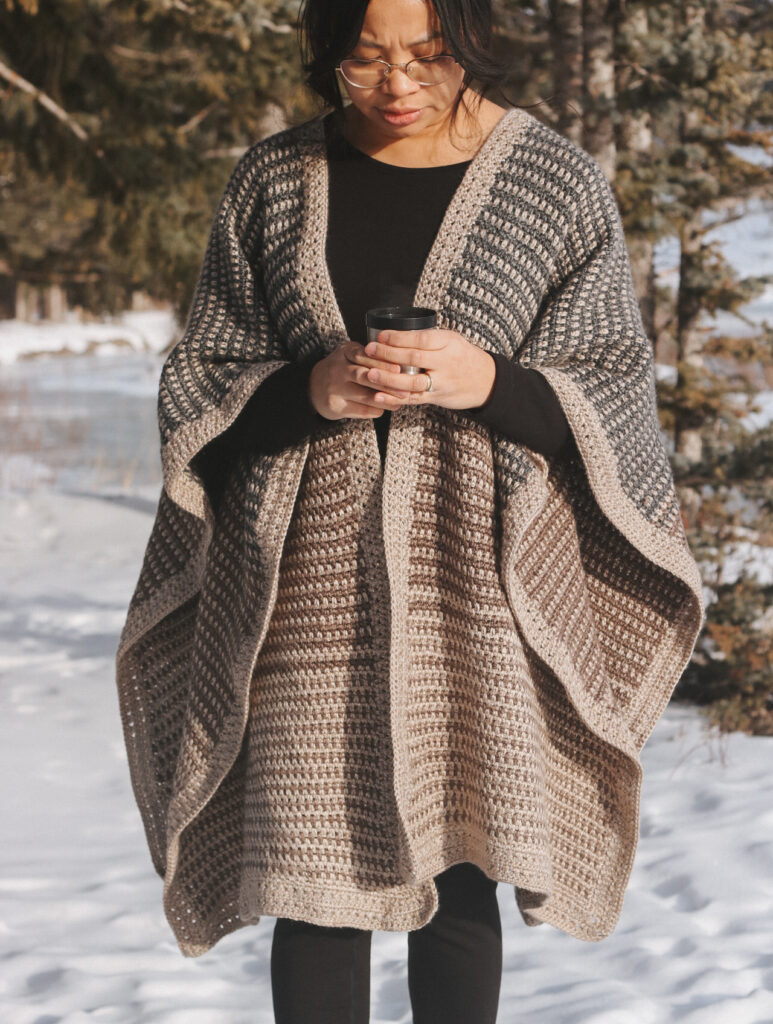
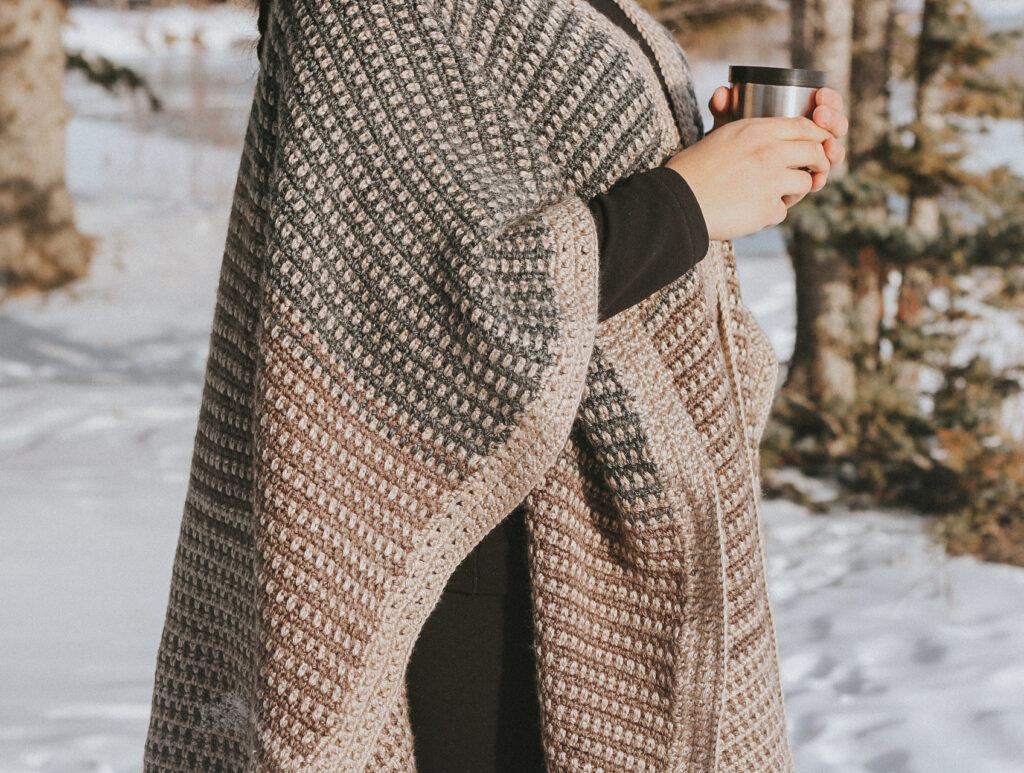
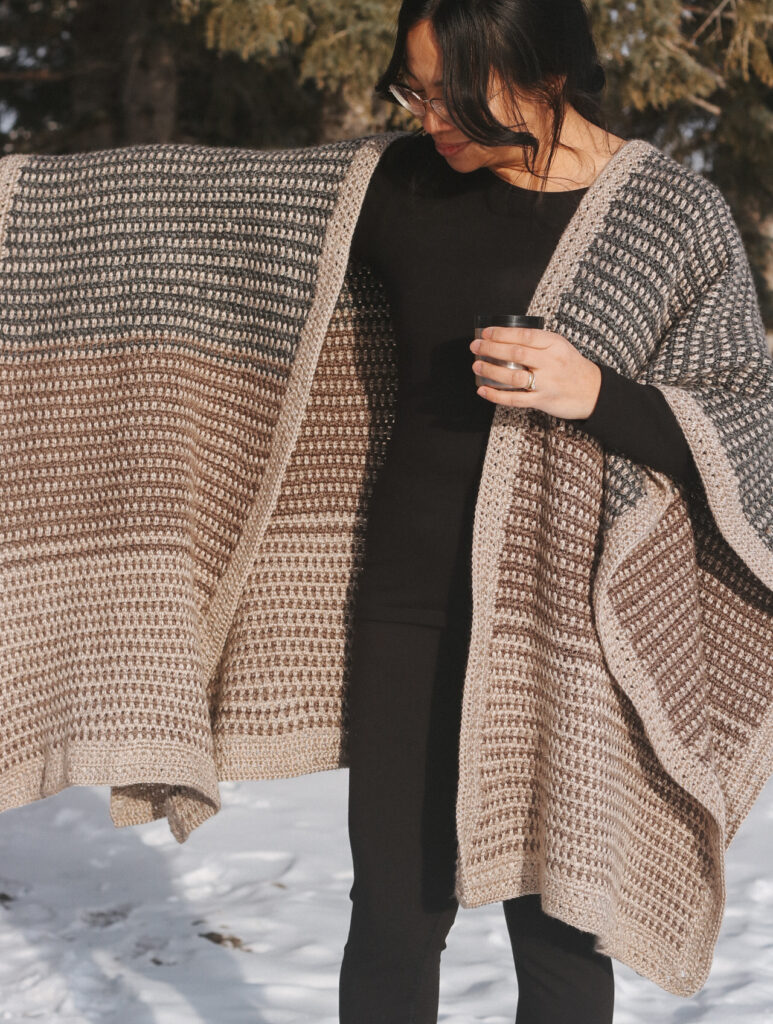
The Wanderer Shawl is a one size crochet shawl that falls over the shoulders like a cozy blanket. The shawl is constructed by forming a large rectangle with a mid split to drape from the back to the front of the body.
The crocheted shawl uses the moss stitch and multiple yarn colours creating an ombre effect. The shawl has a beautiful border going all around.
Related Post: Check out this curated list of sweater patterns to make this year
Want more intermediate crochet shawl patterns?
Check out thee patterns (left to right): Dieppe Wrap, Natu Blanket Wrap
This post contains affiliate links. I get a small commission from any purchase made through these links at no additional cost to the buyer. This allows me to keep free awesome content coming your way. Check out my privacy policy for a full rundown of disclosures.
Yarn
For this crochet project I used a combination of my two favorite yarn collections from Lion Brand Yarn Heartland. Heartland is my favourite yarn line from Lion Brand Yarn because of their affordability, durability, and texture. Heartland features an array of different colours inspired by nature. Despite being an acrylic yarn, Heartland is very soft and produce wonderful drape.
Starting the intermediate crochet shawl pattern
First off, this is a free crochet pattern for the Wanderer Shawl. Are you a visual learner? You can find the premium ad-free pattern which includes extra picture tutorials. This pattern is for personal use only.
Pattern notes:
- The picture shows a 5’2 female weighing approximately 138lbs.
- Colors used in each row is indicated by the letter in the parenthesis at the beginning of each row. You can find the color codes in the materials portion
- Color changes in this garment are done after 2 rows. (example row 1 and 2 uses color A, then Row 3 switches to color B, then another 2 rows using color A)
- When working a single row color switch, do not cut off the first color. Carry the first color and crochet over it as you go. Pay attention to the color transition rows (R43-45, 85-87, 169-171, 211-213 as it may be easier to crochet over or fasten off colors).
- Be careful not to pull or stretch the yarn too much when crocheting over. This will make the garment stitches tight and lead to an uneven width. As you work, it is normal that your rows might get tighter affecting the width. Blocking your work to the proper dimensions will help, after you complete the shawl..
- Rows begin with a ch 2, this is the turning chain and first st (skipped st) in the row.
- Ch between sts are counted as a st in the final st count for convenience and easier tracking of st counts throughout the garment. For the border, the ch 2 in the corner spaces and slip stitches are not counted as sts in the final st counts, only the sc and dc in the rows are (included those performed in the corner spaces).
Materials:
- Primary color: Lion Brand Yarn Heartland in Grand Canyon (1445 yds)
- Secondary Yarns: Lion Brand Yarn Heartland in Mammoth Cave (753 yds) and Great Smoky Mountains (502 yds)
- Color Codes:
- A – Grand Canyon
- B – Mammoth Cave
- C – Great Smoky Mountains
- 4.00mm crochet hook
- Scissors
Gauge – Do not forget to make your gauge!
Moss Stitch Gauge (body of the pattern) – 19 sts by 18 rows = 4 inches
Border Stitch Gauge – 16 sts by 5 rows = 4 inch length and 1.5” wide
Approximate measurements
The shawl is 60” long by 47” wide (due to the weight, the length may add an extra 4” of drape)
Abbreviations:
- Ch – Chain
- Sc – single crochet
- Dc – double crochet
- Slst – slip st
- St/s – Stitch/es
Wanderer Shawl Pattern
Get the inexpensive ad-free pattern for this pattern here. The paid pattern includes picture tutorials to help you with your crocheted wrap
Body
Ch 210+2
R1 (A): sc in the 4th ch from the hook, *ch 1, skip one ch, sc in next ch. Repeat from * until end of the row. The last stitch should be on the first ch of the row. (210 sts)
R2 (A): ch 2, sc in sc space from row below. * ch 1, skip sc st, sc into space. Repeat from * to the end of the row. Your last sc should be in the last sc space. (210 sts)
R3 (B): ch 2, sc in space. * ch 1, skip sc st, sc into space. Repeat from * to the end of the row. (210 sts)
R4 (A): ch 2, sc in space. * ch 1, skip sc st, sc into space. Repeat from * to the end of the row. (210 sts)
R5 (A): ch 2, sc in space. * ch 1, skip sc st, sc into space. Repeat from * to the end of the row. (210 sts)
R6 (B): ch 2, sc in space. * ch 1, skip sc st, sc into space. Repeat from * to the end of the row. (210 sts)
R7-42: repeat R4-6 Respectively with color A and B (210 sts)
Transition to the next color section
R43 (B): ch 2, sc in space. * ch 1, skip sc st, sc into space. Repeat from * to the end of the row. (210 sts)
R44-45 (A): ch 2, sc in space. * ch 1, skip sc st, sc into space. Repeat from * to the end of the row. (210 sts)
R46-47 (B): ch 2, sc in space. * ch 1, skip sc st, sc into space. Repeat from * to the end of the row. (210 sts)
R48 (A): ch 2, sc in space. * ch 1, skip sc st, sc into space. Repeat from * to the end of the row. (210 sts)
R49-84: repeat R46-48 Respectively with color B and A (210 sts)
Transition to the next color section
R85 (C): ch 2, sc in space. * ch 1, skip sc st, sc into space. Repeat from * to the end of the row. ((210 sts)
R86 (B): ch 2, sc in space. * ch 1, skip sc st, sc into space. Repeat from * to the end of the row. (210 sts)
R87 (A): ch 2, sc in space. * ch 1, skip sc st, sc into space. Repeat from * to the end of the row. (210 sts)
R88-89 (C): ch 2, sc in space. * ch 1, skip sc st, sc into space. Repeat from * to the end of the row. (210 sts)
R90 (A): ch 2, sc in space. * ch 1, skip sc st, sc into space. Repeat from * to the end of the row. (210 sts)
R91-111: repeat R88-90 Respectively with color C and A (210 sts)
You are now going to crest a split to go over the shoulder
R112 (C): ch 2, sc in space. * ch 1, skip sc st, sc into space. Repeat from * 44 more times. Totalling 45 space stitches. (90 sts)
R113 (C): ch 2, sc in space. * ch 1, skip sc st, sc into space. Repeat from * to the end of the row. (90 sts)
R114 (A): ch 2, sc in space. * ch 1, skip sc st, sc into space. Repeat from * to the end of the row. (90 sts)
R115-168: repeat R112-114 Respectively with color C and A (90 sts)
Transition to the next color section
R169 (B): ch 2, sc in space. * ch 1, skip sc st, sc into space. Repeat from * to the end of the row. (90 sts)
R170 (C): ch 2, sc in space. * ch 1, skip sc st, sc into space. Repeat from * to the end of the row. (90 sts)
R171 (A): ch 2, sc in space. * ch 1, skip sc st, sc into space. Repeat from * to the end of the row. (90 sts)
R172-173 (B): ch 2, sc in space. * ch 1, skip sc st, sc into space. Repeat from * to the end of the row. (90 sts)
R174 (A): ch 2, sc in space. * ch 1, skip sc st, sc into space. Repeat from * to the end of the row. (90 sts)
R175-210: repeat R172-174 Respectively with color B and A (90 sts)
Transition to the next color section
R211 (A): ch 2, sc in space. * ch 1, skip sc st, sc into space. Repeat from * to the end of the row. (90 sts)
R212-213 (B): ch 2, sc in space. * ch 1, skip sc st, sc into space. Repeat from * to the end of the row. (90 sts)
R214-215 (A): ch 2, sc in space. * ch 1, skip sc st, sc into space. Repeat from * to the end of the row. (90 sts)
R216 (B): ch 2, sc in space. * ch 1, skip sc st, sc into space. Repeat from * to the end of the row. (90 sts)
R217-252: repeat R214-216 Respectively with color B and A (90 sts)
R253-254 (A): ch 2, sc in space. * ch 1, skip sc st, sc into space. Repeat from * to the end of the row. (90 sts)
Fasten off
Repeat R112-254 on the opposite side of the garment.
Border
With the garment laying flat, locate the next stitch on the neckline space after the left panel. Attach yarn here. Rotate the garment to work along the inner left side panel.
SC along the edges of the garment follows a 1:1 ratio (one sc for every row).
Here is a Youtube tutorial to help you with your border. This part – in my opinion – is the most detailed part of this intermediate crochet shawl pattern.
R1: sc in each st and sc-ch 2-sc in each corner st. Slst into the next st along the neckline edge (1,184 sts)
R2: slst 2 sts along the neckline. Turn work and rotate to begin working the 2nd row along the inner edge of the right panel. *skip 1 st, dc into next st, dc into skipped st. Repeat from * until last st along the edge. Dc into last st. Dc-ch 2-dc into corner ch space.
Dc into next st, **skip next st, dc, dc into skipped st. Repeat from ** until last st, dc into last stitch. Dc-ch 2-dc into corner ch space. Work around the garment in this manner until the end of the row. You should end with a criss cross stitch. (1,196 sts)
Count 2 sts on the neckline and slst into the second st.
R3: slst into next st. Turn work and rotate to begin working the 3rd row along the inner edge of the left panel. Sc in each st and sc-ch 2-sc in each corner st. Slst into the next st along the neckline edge. (1,208 sts)
R4: slst 2 sts along the neckline. Turn work and rotate to begin working the 2nd row along the inner edge of the right panel. *skip 1 st, dc into next st, dc into skipped st. Repeat from * until last st along the edge. Dc into last st. Dc-ch 2-dc into corner ch space.
Dc into next st, **skip next st, dc, dc into skipped st. Repeat from ** until last st, dc into last stitch. Dc-ch 2-dc into corner ch space. Work around the garment in this manner until the end of the row. You should end with a criss cross stitch. (1,220 sts)
Count 2 sts on the neckline and slst into the second st.
R5: slst into next st. Turn work and rotate to begin working the 5th row along the inner edge of the left panel. Sc in each st and sc-ch 2-sc in each corner st. Slst into the next st along the neckline edge. (1,232 sts)
Fasten off and weave in ends.
You now have a new intermediate crocheted shawl!
Add this design to your crochet pattern stash and get the premium version now.
I would love to see how your style your Wanderer Shawl. Make sure to tag me @knitsandknotsbyame on IG. Until next time, creatives!
Looking for more beautiful patterns? Make sure to check out all of my beginner friendly patterns here where you can find garments, amigurumi, and accessories.
That’s all for now my maker friend! Remember, never miss a stitch by subscribing to my newsletter. Happy crocheting!
xoxo
Abigail