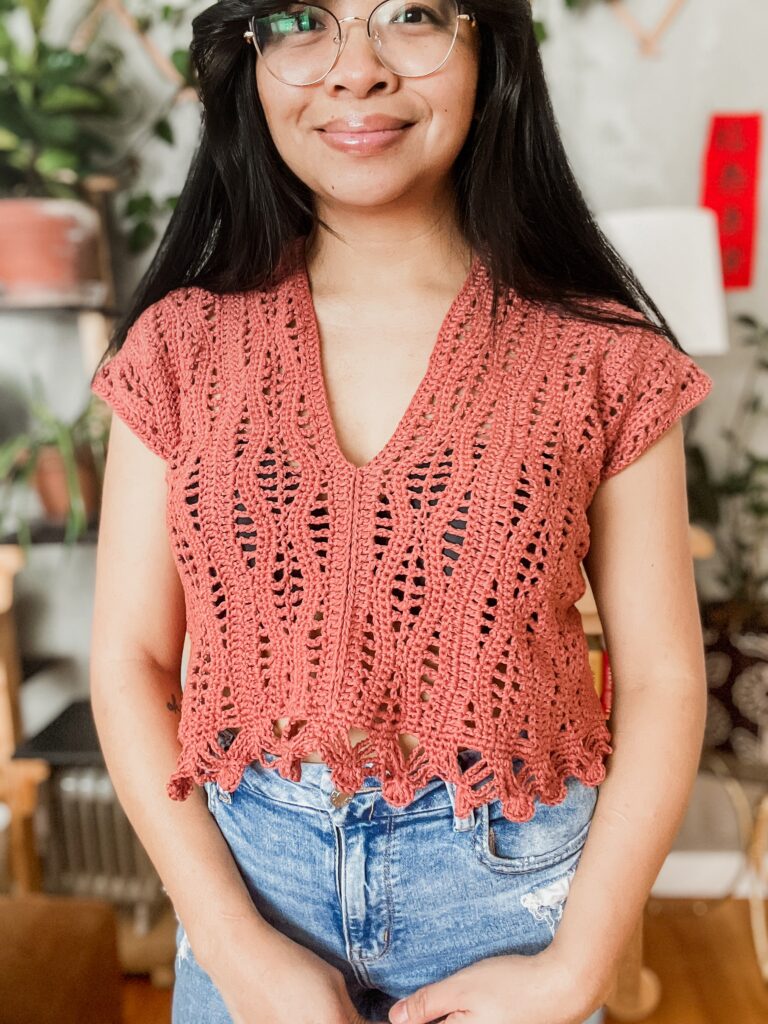
Flattering Summer Crochet Top You Can Make for Free
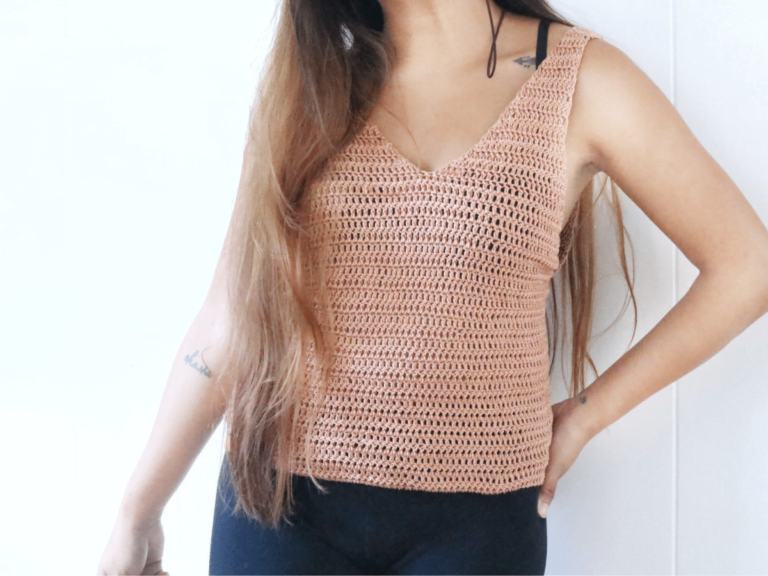
Hello my maker friend! This summer crochet top that I am going to share with you is named after my beautiful mommy, Eva, in lieu of Mother’s day! My mom loves sleeveless tops that shows off her tattooed back and this crochet top checks all the boxes!
I actually made this top last year but I did not really know or feel how I wanted to finish it. I always try to let the yarn tell me what it wants to become, and they usually do, even if it’s months or years after I purchase it! While going through my stash I pulled out the unfinished design and it immediately sang to me!
Related Post: 34+ Crochet Ideas for Summer
What I love most about this design is how flattering it is on my body type (I believe I am an apple). It is designed to flow down loosely over the midsection with beautiful drape. Everyone wants to feel comfortable and confident in the summer right? This design does just that for me.
Get the PDF Pattern for the Eva Summer Top and enjoy this pattern ad-free.
Let’s Talk Summer Crochet
While a lot of makers take the summertime to recharge, I like to design warm weather tops. Crochet is not only for the cold right? In fact, summer crochet tops were all that I made for quite some time since I began my business in Hawaii.
I love the versatility of summer tops. You can wear them in the summer then layer up in the winter. Win-win! Plus, warm weather designs calls for lighter weight yarn which just has the best kind of drape and fit. Drape is a big thing for me because I am personally not a fan of tight clothes. I always want to feel like my skin can breath, using lightweight yarn does just that.
The perfect crochet summer top would be made of a lightweight cotton – or cotton blend – yarn. Cotton absorbs water well which is ideal for warmer days when we tend to sweat. Detailed stitches like lace patterns are also popular crochet stitches during this time because they help make the garment more breathable.
In todays crochet top pattern, I am going to show you how to make an easy lace like stitch. This stitch is suitable for beginners who are ready to try something different. I am also going to show you how to decrease when working with a detailed stitch. This pattern is a great summer crochet top for beginners and intermediate crocheters alike. Let’s get into it.
Disclaimer: this post contains affiliate links. This means that when a purchase is made through the link, a small commission goes back to the blog (with no extra cost to the buyer). This helps keep free and awesome content coming regularly.
Eva Summer Crochet Top Pattern
This is the free written pattern for the Eva Summer Top. Get the ad-free PDF version for your pattern stash here.
Materials:
- 3.5mm Crochet Hook
- DK weight Yarn – I used Lion Brand Yarn’s A Star is Born: Oh Baby Organic Cotton Yarn
- Tapestry Needle
- Scissors
Curious about the yarn I used? Read about Oh Baby Organic Cotton Yarn here.
This crochet pattern is written in US terminology and is created with 2″ ease. See the chart below for bust measurements that this pattern follows.
| XS | S | M | L | XL | |
| Bust Size | 30 | 34 | 38 | 42 | 46 |
| with ease | 32 | 36 | 40 | 44 | 48 |
Front panel of crochet top
Chain 72 (81, 90, 99, 108) +2
Row 1: dc into the third ch from hook. Dc into each ch down the row. (72 (81, 90, 99, 108)
Row 2: ch 2, skip 1, dc-ch-dc. *skip 2, dc-ch-dc. Repeat from * until last 3 sts. skip 1, dc, dc.
Row 3: ch 2, dc, dc into space. *dc into V, 2 dc into space. Repeat from * until last V. dc into space, dc into last st.
Row 4- 29 (31, 33, 35, 37): repeat row 2 and 3 respectively.
Note: This portion measures from the base of the garment to the underarm. If you desire to lengthen your garment, add more rows following the row 2 and 3 sequence.
You are now going to start decrease 2 stitches on both sides of the row. To decrease, treat the first and last 4 stitches and regular stitches to dc2tog into.
Row 30 (32, 34, 36, 38): dc2tog, dc2tog, skip 1, dc-ch-dc. *skip 2, dc-ch-dc. Repeat from * until last 4 sts. Dc, dc2tog, dc2tog
Row 31 (33, 35, 37, 39): dc2tog, dc2tog, dc into V. *2 dc into space, dc into V. Repeat from * until last 4 sts. Dc2tog, dc2tog.
Row 32 (34, 36, 38, 40): dc2tog, dc2tog, ch 1-dc. *skip 2, dc-ch-dc. Repeat from * until last 4 sts. Dc2tog, dc2tog.
Row 33 (35, 37, 39, 41): dc2tog, dc2tog, 2 dc into space. *dc into V, dc into space. Repeat form * until last 4 sts, dc2tog, dc2tog
Row 34 (36, 38, 40, 42): dc2tog, dc2tog, ch 1-dc. *skip 2, dc-ch-dc. Repeat from * until last 4 sts. Dc2tog, dc2tog.
Row 35 (37, 39, 41, 43): dc2tog, dc2tog, dc into space, dc into V. *2 dc into space, dc into V. Repeat from * until last 4 sts, dc2tog, dc2tog.
Row 36 (38, 40, 42, 44): dc2tog, dc2tog, dc into same st, skip 2, dc-ch-dc. *skip 2, dc-ch-dc. Repeat form * until last 4 sts. Dc2tog, dc2tog.
Row 37 (39, 41, 43, 45): dc2tog, dc2tog, dc into v, 2 dc into space. *dc into V, 2 dc into space. Repeat from * until last 4 sts, dc2tog, dc2tog.
For XS ONLY: add two rows of sc and fasten off.
Row 40 (42, 44, 46): dc2tog, dc2tog, skip 1, dc-ch-dc. *skip 2, dc-ch-dc. Repeat from * until last 4 sts. Dc, dc2tog, dc2tog
Row 41 (43, 45, 47): dc2tog, dc2tog, 2 dc into space. *dc into V, dc into space. Repeat form * until last 4 sts, dc2tog, dc2tog
For S ONLY: add two rows of sc and fasten off.
Row 44 (46, 48): dc2tog, dc2tog, ch 1-dc. *skip 2, dc-ch-dc. Repeat from * until last 4 sts. Dc2tog, dc2tog.
Row 45 (47, 49): dc2tog, dc2tog, dc into space, dc into V. *2 dc into space, dc into V. Repeat from * until last 4 sts, dc2tog, dc2tog.
For M ONLY: add two rows of sc and fasten off.
Row 48 (50): dc2tog, dc2tog, dc into same st, skip 2, dc-ch-dc. *skip 2, dc-ch-dc. Repeat form * until last 4 sts. Dc2tog, dc2tog.
Row 49 (51): dc2tog, dc2tog, dc into v, 2 dc into space. *dc into V, 2 dc into space. Repeat from * until last 4 sts, dc2tog, dc2tog.
Row 50 (52): dc2tog, dc2tog, skip 1, dc-ch-dc. *skip 2, dc-ch-dc. Repeat from * until last 4 sts. Dc, dc2tog, dc2tog
For L ONLY: add two rows of sc and fasten off
Row 53: dc2tog, dc2tog, 2 dc into space. *dc into V, dc into space. Repeat form * until last 4 sts, dc2tog, dc2tog
Row 54: dc2tog, dc2tog, ch 1-dc. *skip 2, dc-ch-dc. Repeat from * until last 4 sts. Dc2tog, dc2tog.
Row 55: dc2tog, dc2tog, dc into space, dc into V. *2 dc into space, dc into V. Repeat from * until last 4 sts, dc2tog, dc2tog.
For XL ONLY: add two rows of sc and fasten off.
Back Panel
Chain 72 (81, 90, 99, 108) +2
Row 1: dc into the third ch from hook. Dc into each ch down the row. (72 (81, 90, 99, 108)
Row 2: ch 2, skip 1, dc-ch-dc. *skip 2, dc-ch-dc. Repeat from * until last 3 sts. skip 1, dc, dc.
Row 3: ch 2, dc, dc into space. *dc into V, 2 dc into space. Repeat from * until last V. dc into space, dc into last st.
Row 4- 29 (31, 33, 35, 37): repeat row 2 and 3 respectively.
Note: if you added rows to this portion on the front panel, add the same number of rows here.
Fasten off.
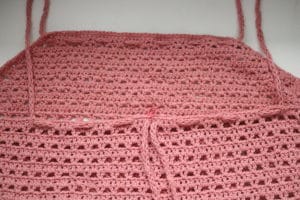
Assemble the crochet top
- Seam the top and back panel together along the sides starting from the bottom up. This should be aligned to end where you started your decreases.
- Crochet an I-cord that is at least 60 inches for XS and S, 65 inches for M, and 70-75 inches for L and XL. I have not put an exact length here since the i-cord length will vary depending on your body. To be safe, make a cord that is longer than what you would expect, follow the next step, then decrease the cord length as suitable before finishing it off.
- Weave the i-cord in even sections across the last row (before the sc’s) on the front panel.
- Turn the garment around, leaving some cord for the strap portion, bring the cord down to the top of the back panel. You want your strap to go directly down from where it ended on the front panel, or a little inward.
- Evenly weave the cord from this point to the midsection, repeat of opposite side.
And Viola! Your summer crochet top is done.


Remember to grab the pdf version of this pattern in the shop if you prefer to have one printed out. The pdf version does include step-by-step photos to guide you in making the top.
Until next time my friend! Make sure to hug your mom, treat yourself, and spread appreciation to all the mummies in your life today.
xoxo,
Abigail