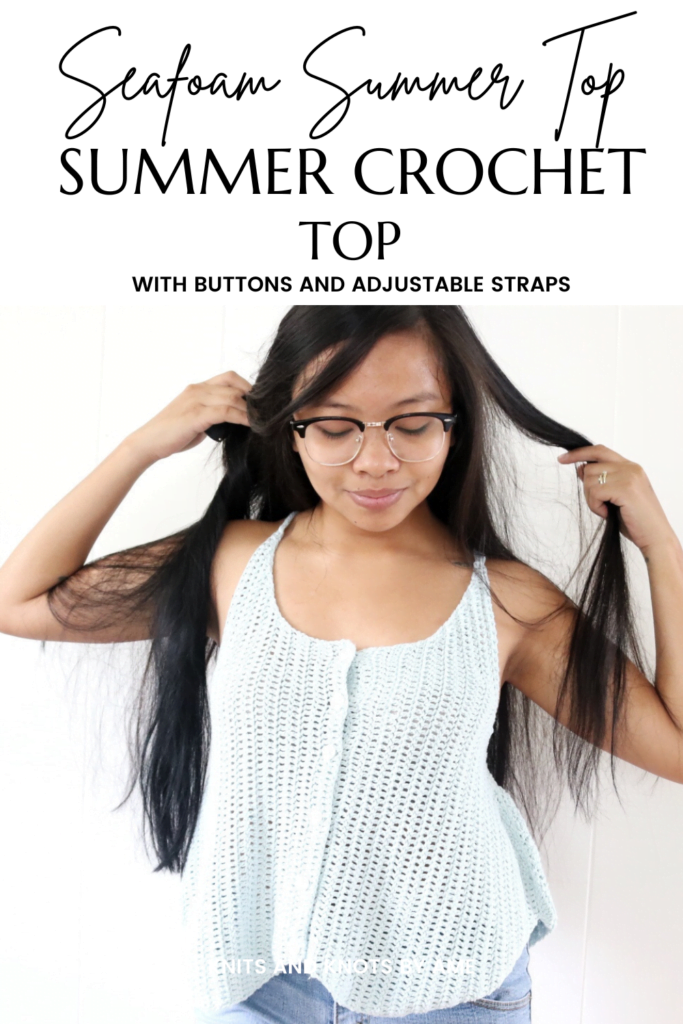
How to Easily Make This Free Crochet Summer Top Pattern for Beginners
This post show you how to make crochet summer top. This pattern uses CYC 3 DK (lightweight) yarn for great drape and features buttons and adjustable straps.
Get the inexpensive ad-free pattern for this Seafoam Summer Top Pattern. Print and add to your crochet pattern collection now.
See more crochet top patterns in this list I curated filled with trendy:
Related: Sunrise Bralette Pattern
This post may contain affiliate links. I get a small commission from any purchase made through these links at no expense to the buyer. This allows me to keep free awesome content coming your way. Check out my privacy policy for a full rundown of disclosures.
Inspiration behind the Seafoam Top
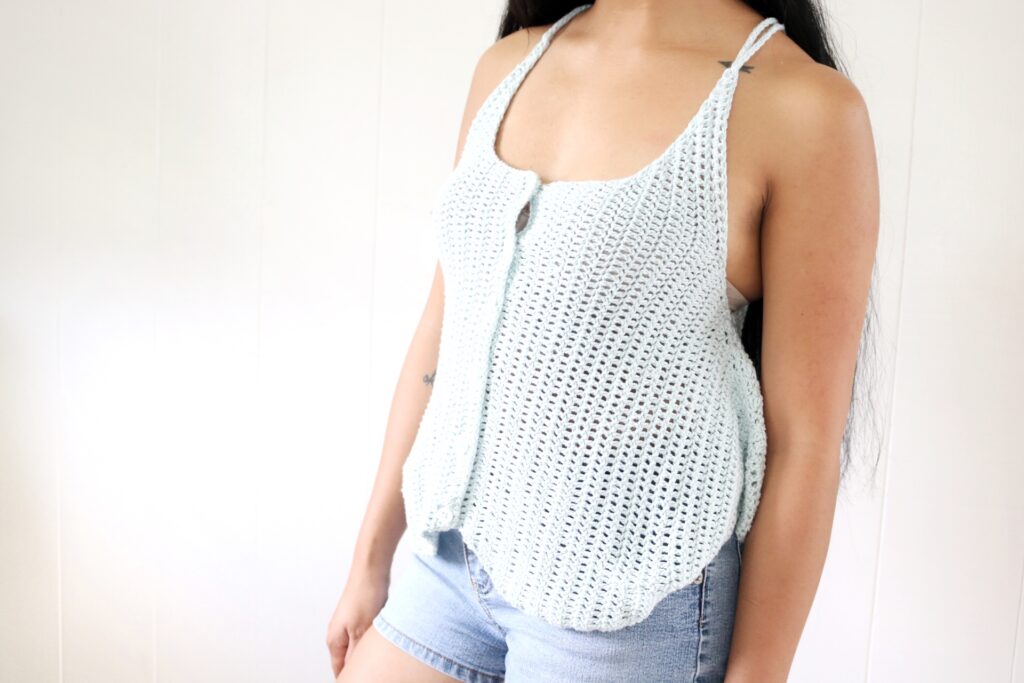
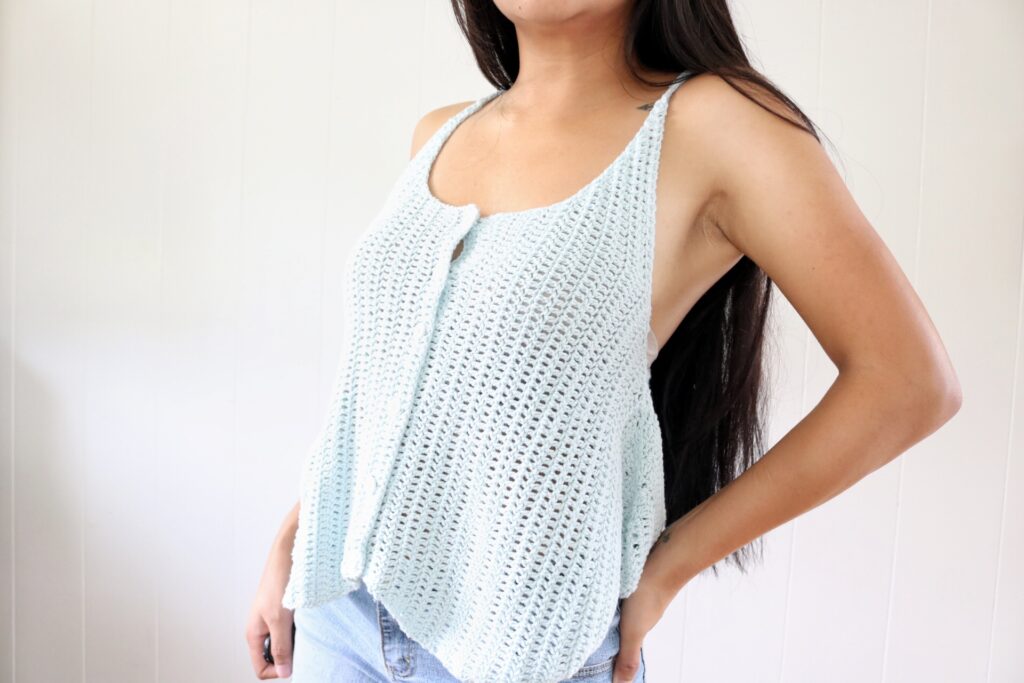
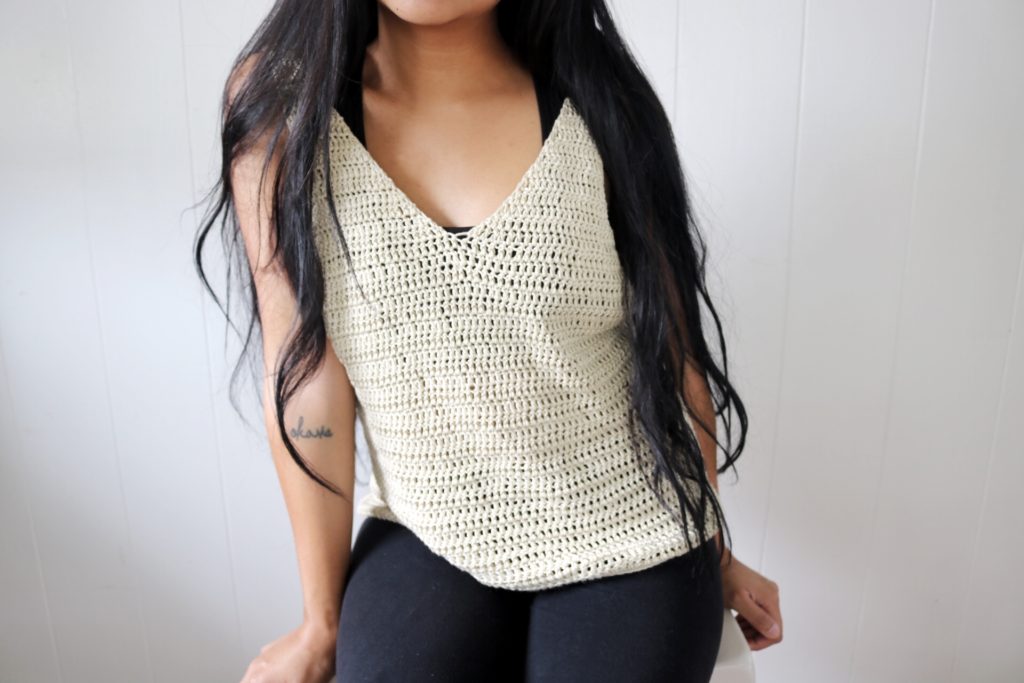
The Seafoam Top is a crochet summer top that features a buttoned up mid line and adjustable straps. The sides of the top flare outwards creating a comfortable and flattering fit. I like my clothes airy and wide, not too fit or else I feel like I am being suffocated. If you are anything like me, this is a great top for you make this summer.
This top was inspired by box silhouettes and is actually a part of a three part series of box tops made with Paintbox Yarns Cotton DK.
When I made this top, I was still living in Hawaii and heavily influenced by every day island attire, the flow of garments as the wind caught it (I lived in a VERY VERY windy area!), and the beautiful scenic spots I loved bringing my wife to when she visited from Canada.
Design Details
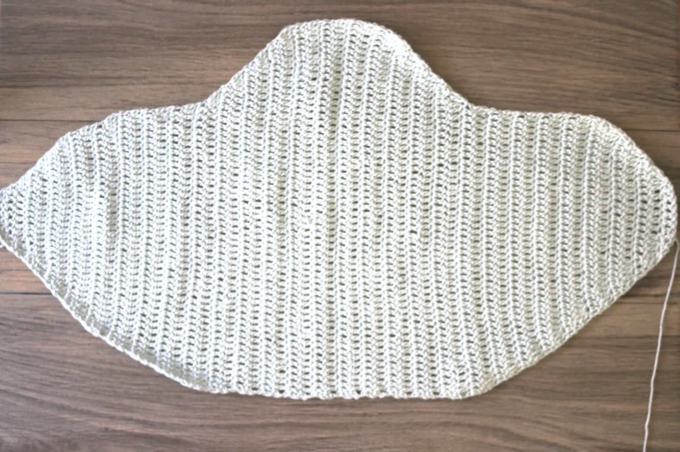
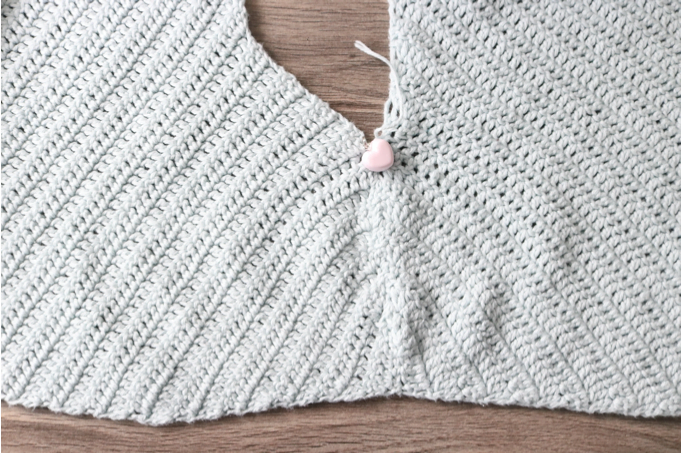
The crochet summer top is made of three panels: two front panels sewed on the sides to a back panel. The top is then closed together using buttons along the front.
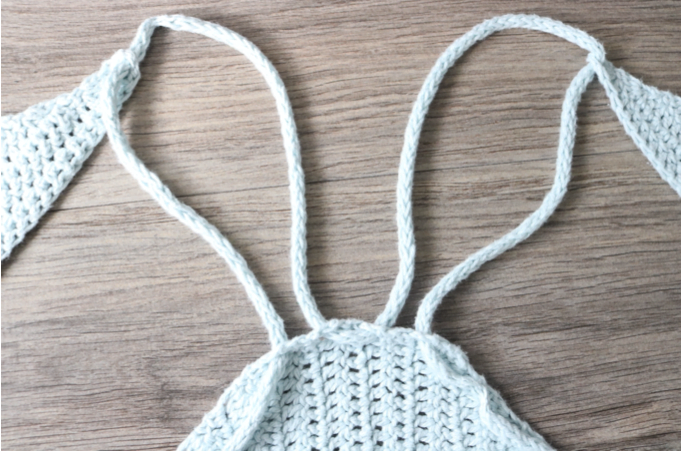
A long I-cord is used and laced on the garment for an adjustable strap. This is my favourite detail of the top and I love how the straps are tied into a bow to secure in the back. The strap lines are absolutely beautiful.
This crochet summer top has a relaxed fit that drapes beautifully with the perfect yarn. Totally giving you summer vibes of an island getaway with unlimited cocktails!
How to Style this Summer Crochet Top
Summer tops are generally easy to style with a pair of cute shorts and footwear of your choice.
Styling crochet summer tops can even be useful during transitions months with a pair of leggings and topped with a cute cardigan.
See more crochet projects to try this summer in this list I curated filled with trendy and FREE patterns:
Yarn Used for the Seafoam Top
For this design, I used Paintbox Yarn’s Cotton DK. For the longest time, Paintbox Yarns has been my go to cotton dk wight yarn because of their enormous color choices tand affordability.
A close alternative to this yarn would be Lion Brand Yarn’s 24/7 Cotton DK. This yarn is highly comparable to Paintbox Yarn’s Cotton DK, however with less color options BUT more yardage.
Cotton yarn can get stiff worked up and after washes and use. If drape is what you are aiming for, I would recommend a cotton blend. Still cotton for sweat absorption and airiness, but a blend of something like silk or bamboo makes it extra cool and drapes beautifully.
I would highly recommend King Cole Bamboo Cotton or Lion Brand Yarn’s Truboo or Coboo.
For this pattern, any sport weight yarn would do great! just make sure to make a gauge to make sure you get the right measurements/results.
Crochet Summer Top: Seafoam Top
Due to the nature of the pattern, this post contains the free crochet pattern for size Small of the Seafoam Top. You can find the other sizes (XS-XL) in this ad-free PDF version here for a low costs.
Sizes – XS-XL
Materials:
*based on size respectively
- 3.5mm crochet hook
- Cotton DK (Paintbox Yarns) XS:480 yds, S:550 yds, M:685 yds, L:825 yds, XL: 1,020 yds
- Scissors
- Tapestry needle to weave in ends
- 20mm Buttons (or any size buttons that will comfortably fit between your stitches)
Gauge – 4”x4” – 218 dc x 11 rows
Abbreviations (US Terms)
- Ch – chain
- Sc – single crochet
- Dc – double crochet
- Dc2tog – double crochet 2 together St(s) – stitch/stitches
Pattern Notes
- This pattern is written in US terms
- All panels are made in rows, turn after each row
- It is best to highlight your respective size in the pattern before you start working
- It is suggested to block garment.
- Photo above is a size small pictured on a 5.1” female with a bust of 34 and weight of 125lbs
- Photos are provided to help you along the way. Enjoy!!
Want more summer patterns?
Check out thee patterns (left to right): Jasper Coverup, Sunrise Bralette, Catalan Beach Tank


Crochet Pattern
Are you a visual learner? You can get the PDF pattern at low cost here on the site (cheapest option) or go to where you are familiar Etsy or Ravelry. Want everything you need plus the pattern?
Front Panel (make 2)
Ch 55
R1: dc into 3rd ch from hook (serves as first and second dc), dc into next 52 ch (54 sts) R2-3: Ch 2 (serves as first dc), dc into next 53 st (54 sts)
R4: ch 2, dc in next 52 st, 2 dc (55 sts)
R5: ch 2 dc into same st, dc into next 53 st (56 sts)
R6: ch 2, dc in next 54 st, 2 dc (57 sts)
R7: ch 2 dc into same st, dc in next 56 st (58 sts)
R8: ch 2 dc into same st, dc in next 56 st, 2 dc (60 sts)
R9: ch 2 dc into same st, dc into next 57 st, 2dc, 2dc (63 sts)
R10: ch 2 dc into same st, 2 dc, dc into next 61 st (65 sts)
R11: ch 2, dc in next 62 st, 2dc, 2dc (67 sts)
R12: ch 2 dc into same st, 2dc, dc in next 65 st (69 sts)
R13: ch 2, dc in next 67 st, 2dc, 2dc (71 sts)
R14: ch 2 dc into same st, 2dc, dc into next 69 st (73 sts)
R15: dc2tog, dc in next 69 st, 2dc, 2dc (74 sts)
R16: ch 2 dc into same st, 2dc, dc into next 70 st, dc2tog (75 sts)
R17: dc2tog, dc into next 47 st, dc2tog, dc2tog (50 sts)
R18: dc2tog, dc2tog, dc in next 44 st, dc2tog (47 sts)
R19: dc2tog, dc in next 41 st, dc2tog, dc2tog (44 sts)
R20: dc2tog, dc2tog, dc into next 38 st, dc2tog (41 sts)
R21: dc2tog, dc in next 35 st, dc2tog, dc2tog (38 sts)
R22:ch 2, dc in next 33 st, dc2tog, dc2tog (36 sts)
R23: dc2tog, dc2tog, dc into next 32 sts (34 sts)
R24: ch 2, dc into next 29 st, dc2tog, dc2tog (32 sts)
R25: dc2tog, dc2tog, dc into next 28 st (30 sts)
R26: dc2tog, dc2tog, dc into next 22 st, dc2tog, dc2tog (26 sts)
R27: dc2tog, dc2tog, dc into next 18 st, dc2tog, dc2tog (22 sts)
R28: dc2tog, dc2tog, dc into next 14 st, dc2tog, dc2tog (18 sts)
R29: dc2tog, dc2tog, dc into next 10 st, dc2tog, dc2tog (14 sts)
R30: dc2tog, dc2tog, dc into next 6 st, dc2tog, dc2tog (10 sts) R31: ch 2, dc into next 5 st, dc2tog, dc2tog (8 sts)
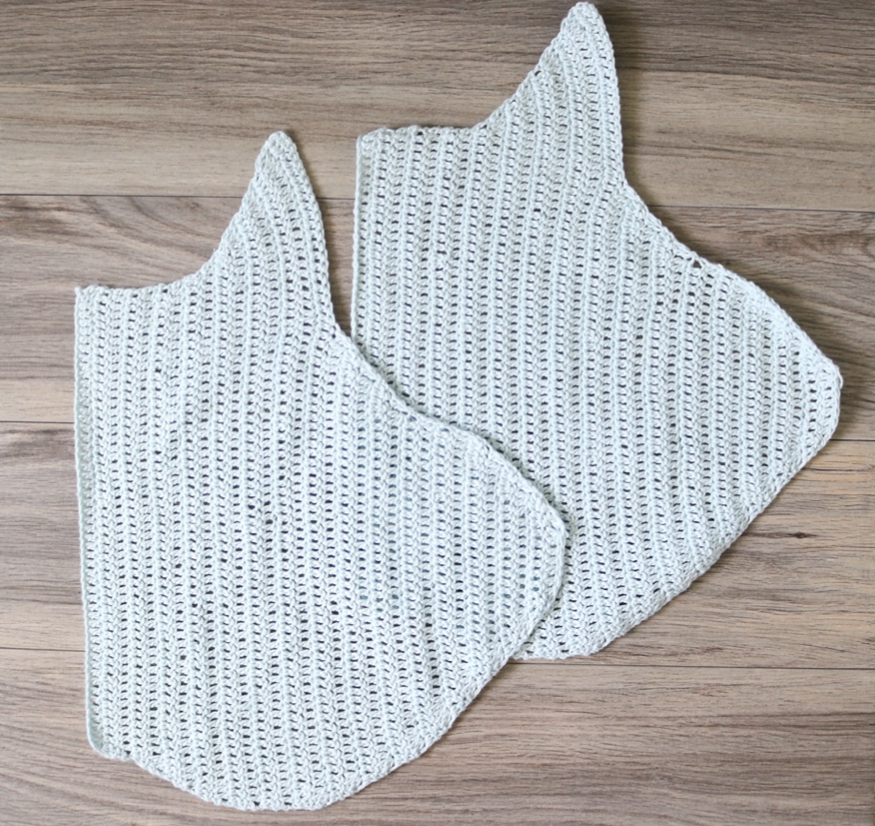
Back Panel
Ch 9
R1: dc in 3rd ch from hook, dc in next 6 (8 sts)
R2: ch 2 dc into same st, dc into next 6, 2dc (10 sts)
R3: ch 2 dc in same, 2dc, dc into next 6 st, 2dc, 2dc (14 sts) R4: ch 2 dc in same, 2dc, dc into next 10 st, 2dc, 2dc (18 sts) R5: ch 2 dc in same, 2dc, dc into next 14 st, 2dc, 2dc (22 sts) R6: ch 2 dc in same, 2dc, dc into next 18 st, 2dc, 2dc (26 sts) R7: ch 2 dc in same, 2dc, dc into next 22 st, 2dc, 2dc (30 sts) R8: ch 2, dc into next 27 st, 2dc, 2dc (32 sts)
R9: ch 2 dc into same st, 2dc, dc into next 30 (34 sts)
R10: ch 2, dc into next 31, 2dc, 2dc (36 sts)
R11: ch 2, dc into next 33 st, 2dc, 2dc (38 sts)
R12: ch 2, dc into next 36 st, 2dc (39 sts)
R13: ch 2 dc into same st, dc into next 38 st (40 sts)
R14: ch 2, dc into next 38 st, 2dc (41 sts)
R15: ch 2 dc into same st, dc into next 40 (42 sts)
R16:ch 2, dc into next 40 st, 2dc (43 sts)
R17: ch 2 dc into same, dc into next 42 st (44 sts)
R18: ch 2, dc into next 42 st, 2dc (45 sts)
R19: ch 2, dc into next 42 st, 2dc, 2dc (47 sts)
R20: ch 2 dc into same st, 2dc, dc into next 45 st (49 sts) R21: ch 2, dc into next 46 st, 2dc, 2dc (51 sts)
R22: ch 2 dc into same st, 2dc, dc into next 49 st (53 sts) R23: ch 2, dc into next 49 st, 2dc, 2dc (55 sts)
R24: ch 2 dc into same st, 2dc, dc into next 53 st (57 sts) R25: ch 2, dc into next 54 st, 2dc, 2dc (59 sts)
R26-32: ch 2, dc into next 58 st (59 sts)
R33: ch 2, dc into next 54, dc2tog, dc2tog (57 sts)
R34: dc2tog, dc2tog, dc into next 53 st (55 sts)
R35: ch 2, dc into next 50 st, dc2tog, dc2tog (53 sts)
R36: dc2tog, dc2tog, dc into next 49 st (51 sts)
R37: ch 2, dc into next 46 st, dc2tog, dc2tog (49 sts)
R38: dc2tog, dc2tog, dc into next 45 st (47 sts)
R39: ch 2, dc into next 42 st, dc2tog, dc2tog (45 sts)
R40: ch 2, dc into next 42, dc2tog (44 sts)
R41: dc2tog dc into next 42 (43 sts)
R42: ch 2, dc into next 40, dc2tog (42 sts)
R43: dc2tog, dc into next 40 st (41 sts)
R44: ch 2, dc into next 38 st, dc2tog (40 sts)
R45: dc2tog, dc into next 38 st (39 sts)
R46: ch 2, dc into next 36 st, dc2tog (38 sts)
R47: dc2tog, dc2tog, dc into next 34 st (36 sts)
R48: ch 2, dc into next 31 st, dc2tog, dc2tog (34 sts)
R49: dc2tog, dc2tog, dc into next 30 st (32 sts)
R50: dc2tog, dc into next 28, dc2tog (30 sts)
R51: dc2tog, dc2tog, dc into next 24, dc2tog, dc2tog (26 sts) R52: dc2tog, dc2tog, dc into next 18 st, dc2tog, dc2tog (22 sts) R53: dc2tog, dc2tog, dc into next 14 st, dc2tog, dc2tog (18 sts) R54: dc2tog, dc2tog, dc into next 10 st, dc2tog, dc2tog (14 sts) R55: dc2tog, dc2tog, dc into next 6 st, dc2tog, dc2tog (10 sts) R56: ch 2, dc into next 5 st, dc2tog, dc2tog (8 sts)
Assembly
- Place front panel on back panel and seam from bottom of 8 side sts up
- Seam 10 rows
- Repeat on opposite side
- Add buttons along second row of first panel
- For the straps crochet an i-cord of 70”. You can adjust length to your preference. You may also use any other alternative strap that best fits your taste.
-insert into upper right portion of back panel. Go through top portion of panel to the right. Locate the middle portion of back panel, insert into one row to the right of middle portion of back panel, count two rows to the left and insert. Go up and insert to the top of the panel to your left, pull down and insert to the upper left portion of the back panel.
You now have a new crochet summer top!
Looking for more patterns? Make sure to check out all of my beginner friendly patterns here where you can find garments, amigurumi, and accessories.
Want more crochet summer patterns?
That’s all for now my maker friend! Remember, never miss a stitch by subscribing to my newsletter. See you next time!
xoxo
Abigail