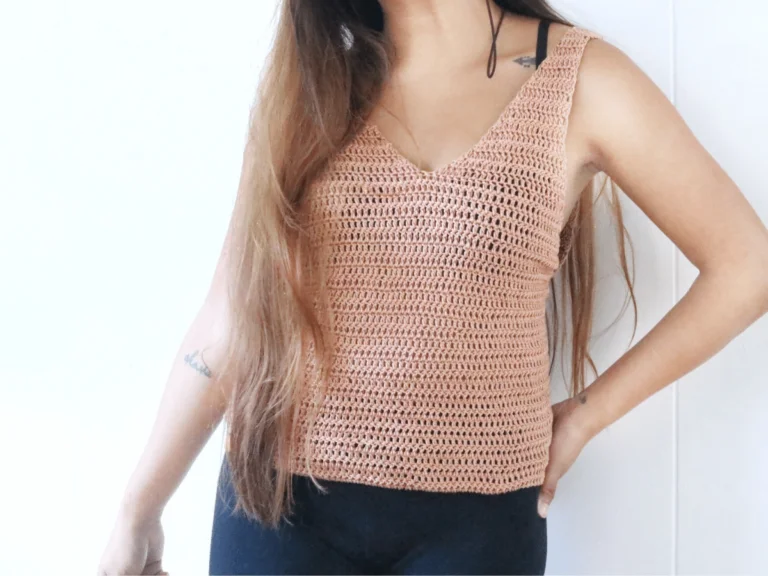
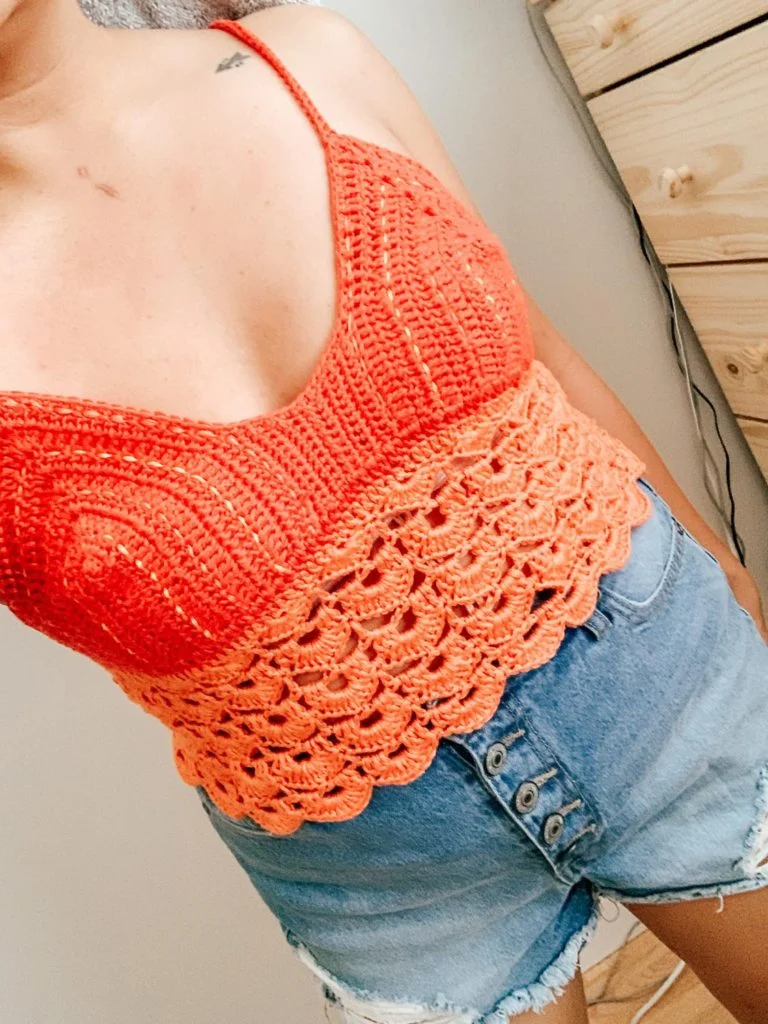
How to Make the Sunrise Bralette – Free Crochet Bralette Pattern
Hello again my maker friend! You have found your way to the Sunrise Bralette, a fully adjustable crochet bralette with just the perfect amount of stretch to provide you with the perfect fit! The pattern uses basic crochet stitches combined to make a beautiful lace effect. Ready to get started on this comfy summer crochet project? Let’s dive right in!
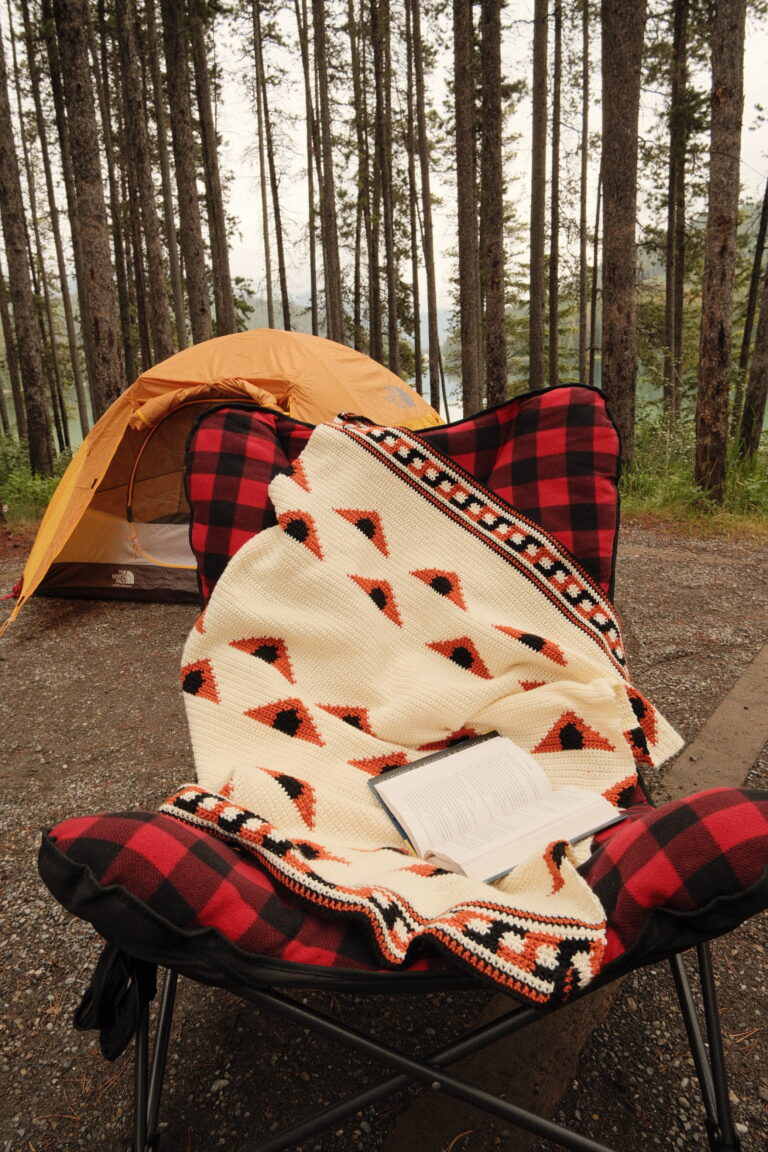
Similar Design: Seafoam Summer Top
Disclaimer: This post contains affiliate links. I get a small commission from any purchase made through these links at no expense to the buyer. This allows me to keep free awesome content coming your way. Check out my privacy policy for a full rundown of disclosures.
Heat Wave Inspiration
We are well into the summer months and hot days are not going anywhere! I love a good breezy top. In fact, the first summer design I made this year was all about breeze! Calgary has reached its highest recorded heat EVER recently which sparked the inspiration for so many new designs. First was this simple bralette.

If you follow me on Instagram, you know I tend to play around a lot with my wife. She is just hilarious! I posted a poll that basically said it was so hot in Calgary and if people thought I should make her a crocheted halter top. The choices were “Do it! I wanna see!” and “leave the girl alone”. You can bet a huge chunk of everyone voted for the first choice! Ha!
Related Post: 34+ Summer Crochet Ideas You Need to Try
So I got to work using extra yarn from my Bette Sunshine Top to make a beautiful crochet lace bralette. We then shot one of our quick and funny reels and man oh man it was HILARIOUS! Our friends and family definitely for a kick out of the video. Head over to my account to watch it in my feed or on my reels @knitsandknotsbyame.
How to Style a Crochet Bralette
When styling a basic bralette you should keep in mind where you intend on going. Are going to music festivals, hanging out at the beach, a lakeshore getaway, or just running errands and shooting for day comfort? Think about how you would style a tank top and where you would wear those.
For relaxed occasions, a normal bralette is worn to beat the summer heat, in this case pairing them with a cute pair of shorts. If you are more conscious about what you wear in public places like the mall, then maybe consider throwing on a light beach coverup.
Try to keep makeup minimal with a barely-there look – in fact, try not to wear any at all! Bralettes are made to be light and the center of attraction and being naturally exposing in nature, I personally think adding lots of accessories or make-up can quickly ruin a beach vibe look. Rule of thumb when styling a bralette: less is more!
The Best Cotton Yarn for Crochet Tops
Cotton is the go-to yarn for summer crochet and knitting. Cotton is a great fiber for absorbing moisture like water and sweat. This makes it popular during summer time to keep people comfortable.
I prefer cotton-bamboo blends because bamboo has a natural cooling effect. Here are my top three cotton-bamboo blends:
For this pattern, I used my extra Truboo yarn which works out perfectly!
Size inclusive Crochet Bralette Pattern – a size for anyBODY
This pattern is made using the tutorial method. This method is a great way to ensure the crochet pattern can be made to fit any body type and size. This is exactly why I love making my own garments! Skip the long line at trendy stores and make your own cute top in less than a day! In this tutorial, I will show you how to measure for and crochet your perfect cup size, band size, and straps.
How to add padding to a crocheted bralette
If you want to add removable bra pads for extra support, make another set of bra cups without the midsection portion.
Align the second set of cups along with the cups on the bralette and seam the cups to the bralette using a whip stitch. Refer to the image below.
Please note, using a whip stitch allows you to attach the cup to the bralette using stitch only on the wrong side of the bralette, this keeps the right side nice and clean.
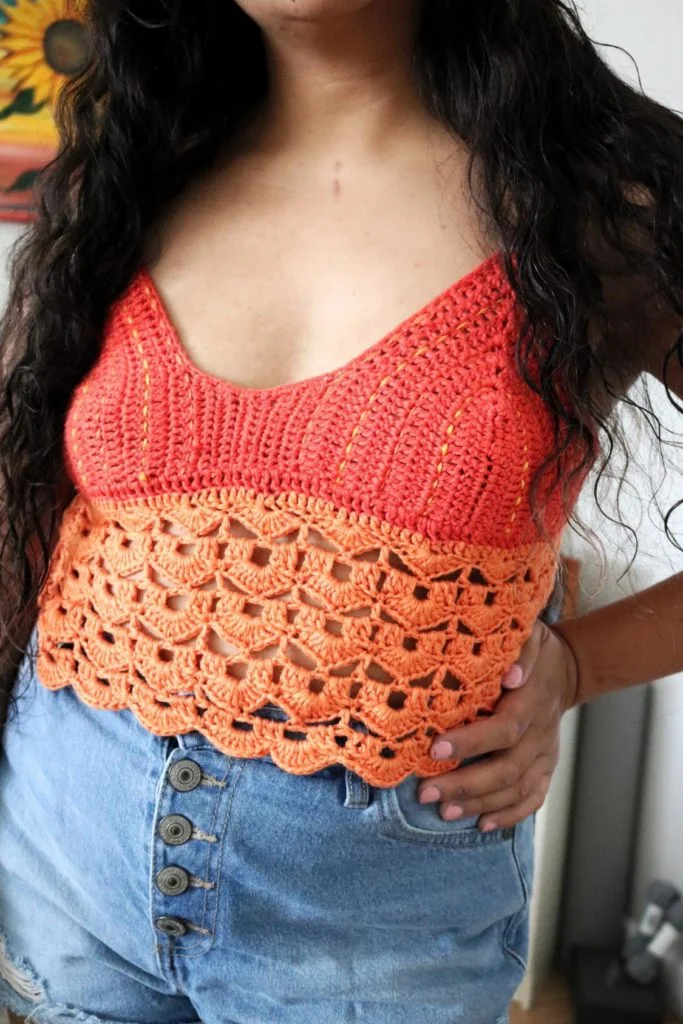
The Sunrise Bralette Crochet Pattern
Materials
- Measuring Tape
- CYC Level 3 yarn – DK weight
- 3.5mm crochet hook
- Scissors
Gauge
The gauge for this pattern should be made to practice the desired tension. This will help keep your bra cups accurately sized. Please do not skip this part. This pattern follows a 20st x 10 row gauge for a 4 inch square.
Sizes
All sizes under the gorgeous sun 🙂 this tutorial is fully customizable and I am going to walk you through how to alter your crochet top to fit you perfectly. Note: Because this pattern is done in a tutorial method, there will be no portion for final stitch count.
Pattern Notes:
- Because this pattern is done in a tutorial method, there will be no portion for final number of stitches per row.
- The ch 2 in each row serves as a dc and is a turning chain.
- The cups are made in back and forth rows, the end of row stitches should create a straight bottom where the bottom of the cup is.
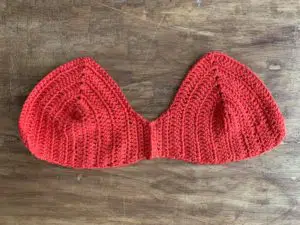
Bralette cups (make 2)
To start, we need to figure our two values (n and n2)
Measuring the distance from under your breast to just above the nipple or mid section of your breast.
For me this number is around 3 inches.
Now you take the number, divide it by 4, then multiply that by 20.
For me this will look like 3 divided by 4 = .75 x 20 = 15.
The number will be the amount of stitches (n) you are going to chain to start the bralette cup.
for the second value minus 2 from n and you are going to get n2. (n-2=n2)
Chain n + 2.
Row 1: dc into the third ch from the hook. Dc in each ch down the row until the last ch (this is the first ch made at the beginning of the row, from here on I will refer to this point as tip). 2 dc – ch – 2dc into the last ch. dc into each ch going down the other side of the row.
Row 2: ch 2 (serves as first dc), dc into each st until tip. 2dc – ch – 2dc in tip. dc in each st down the her side of the row.
Row 3: ch 2, dc, 2 dc into next st. *dc, dc, 2 dc. Repeat from * until you reach the tip. 2 dc – ch – 2 dc into the tip. Repeat from * around end of the row.
You are going to repeat this pattern and let it grow until you each your desired coverage level.
Next section is going to be the midsection of the cups. Continue along without cutting your yarn, you are working on the side of the cup.
Row 1: ch 1, sc into the next st, sc into each stitch until you reach a total of n2 stitches.
Row 2: sc2tog, sc into each st down the row.
Row 3: ch 1, sc in each st until the last 2 sts, sc2tog.
Row 4: sc2tog, sc into each st down the row
Row 5: ch 1, sc in each st until the last 2 sts, sc2tog.
Row 6: ch 1, sc into each st until end of the row.
Repeat row 6 until it reaches the mid section of your rib cage. To do so, try the cup on and see where the flap end. Add or take out rows as needed.
Fasten off
Take both cups and seam the mid sections together.
Last part of the cups is the side section.
Attach yarn to the bottom part of the opposite side of the cup
Row 1: ch 1, sc into the next st, sc into each stitch until you reach a total of n2 stitches.
Row 2: sc2tog, sc into each st down the row.
Row 3: ch 1, sc in each st down the row.
Row 4: sc2tog, sc into each st down the row.
Row 5: ch 1, sc in each st down the row.
Row 6: sc2tog, sc into each st down the row
Row 7: ch 1, sc in each st down the row.
Row 8: sc2tog, sc into each st down the row
Row 9: ch 1, sc in each st down the row.
Row 10: sc2tog, sc in each st down the row.
Row 11: ch 1, sc in each st down the row until last 2 sts. sc2tog.
Repeat Rows 10 and 11 respectively until one st remains.
Fasten off and repeat on the side of the other cup.
Take both cups and seam the midsections together.
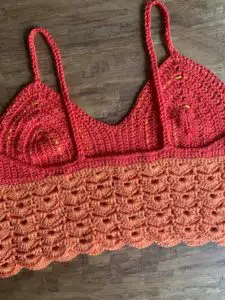
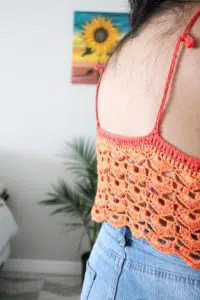
Lace portion
To begin the lace portion, take the tape measure and measure around your body at the bottom of your breast where the rest of the top will fall.
For example, my measurement was 36.
Next, take the bralette part that you just made and measure it from end to end.
My measurement was 26.5.
Subtract the second value from the first. Mine would be 9.5.
Take the number, divide it by 4, then multiply it by 20. Let’s call this number n3.
In my case my n3 would be 47.5. I chose to round down to 47. If you want to round up, you do you 🙂
Attach yarn to one end of the bralette.
chain n3, sl st to the other end of the bralette. Turn the piece upside down and now you are going to start working in the round, so slip stitch to end each round.
Round 1: Ch 2, dc into each ch st. dc across the bottom of the bralette. For this part, you need to space your stitches evenly and end with a total number of stitches that is divisible by 6. (for me I had a total of 168)
Round 2: Ch 2, dc in each st.
Round 3: ch 1, sc, *skip 3 sts, 9 dc into the next st, skip 3 sts, sc. Repeat from * until the end of the round.
Round 4: ch 6, sc into the 5th dc in the shell below, ch 3, dc into sc below. *ch 3, sc into the 5th dc in the shell below ch 3, dc into sc below. Repeat from * until end of the round.
Round 5: ch 3, 3dc into the ch space below. *ch 1, 3dc into the ch space below. Repeat from * until end of the round.
Round 6: ch 1, sc into next st. * 9 dc into the ch 1 below, sc into next ch 1. Repeat from * until end of the round.
Repeat rounds 4-6 until desired length.
Fasten off.
Bralette Straps
Now for the final part, how exciting! Before beginning to make the straps, single crochet around the entire top of the bralette for a clean finishing.
You may need help with the measurements for this part.
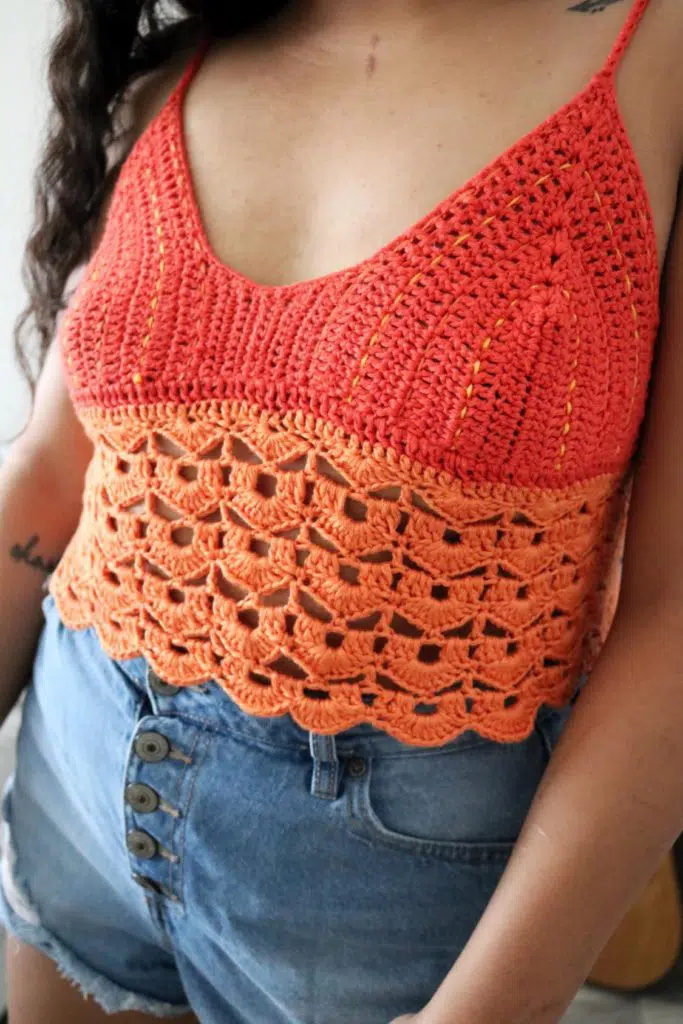
To get an accurate measurement, try on your bralette and fix it to fit as you please. Have someone measure the strap lengths measuring from the tip of the bralette, over the shoulder, and down to wear you want to attach it to the back. I had my straps run straight down, you can do the same or even measure to make criss-cross straps .
My strap measurements were 17 inches.
To make the strap I chose to do a single crochet foundation stitch. You can find the stitch tutorial on Youtube.
When making straps, you must consider than straps will stretch from the weight of the garment and gravity as it drapes over the body. To get an accurate fit, continue with the foundation chain until it reaches the strap measurement WHEN stretched.
Sew the straps in place, and you’re done!
For more patterns click here.
That’s all for now my maker friend! I am so excited to share more summer inspired patterns, never miss a stitch by subscribing to my newsletter. See you next time!
xoxo
Abigail