How to Make a Knitted Tank Top for Beginners
This post contains the free knitted tank top pattern used in the Bette Sunshine Knit Top – a knitted tank top made using sport weight yarn and features a pop of color with embroidered lines. The design is a part of my 2021 Pride Collection, you can find the first design here – Shane Pride Shirt. Want to learn how to knit a tank top? What about how to embroider designs on a basic knit top? Keep on reading.
Note: This post contains affiliate links. This means that I earn a small commission from purchases made through the link – at no extra cost to the buyer. This allows me to keep awesome FREE content coming your way.
Crochet and Knit Pride Designs
Pride month is all about self expression, love, and acceptance. Last week, the Shane Pride Shirt (free crochet pattern) kicked off the pride month collection. The shirt had an overwhelming response and was proof that this month is truly the month of love. Sorry February! Each week for the month of June I will be releasing a new knit or crochet pattern inspired by pride.
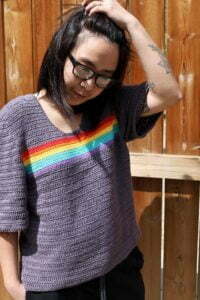

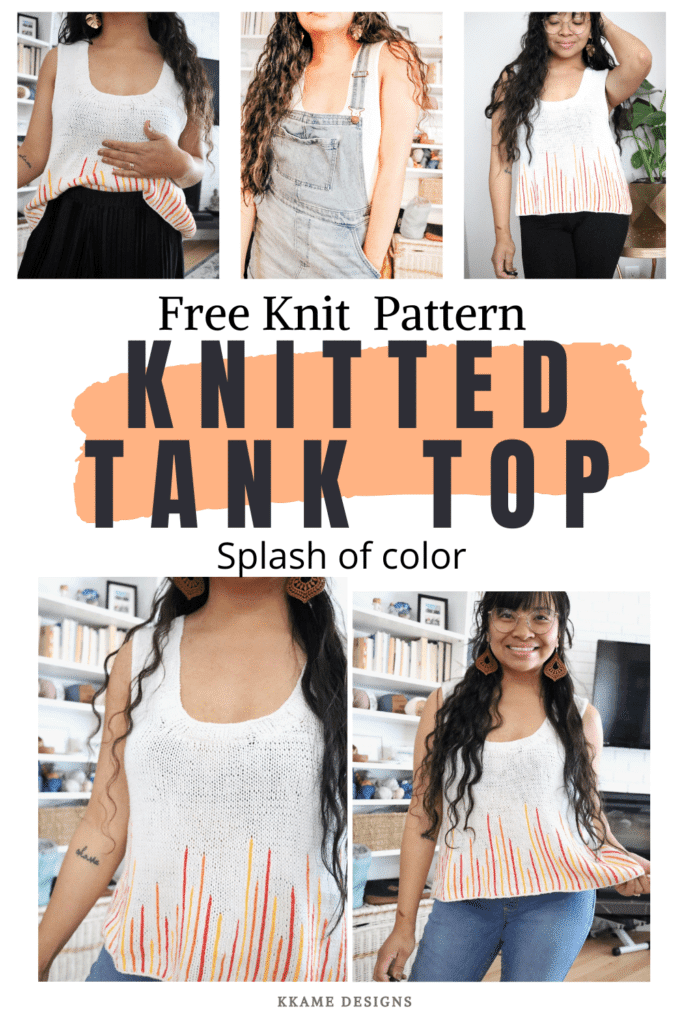
The Bette Sunshine Knit Top is a basic knit top with a pop of color. Originally, I wanted to use rainbow colors, however I decided to use R-O-Y (red, orange, and yellow) to create rays of sunshine because – let’s be honest – pride month just radiates positivity and light! Because the stripes are added AFTER the knitted top is made, the maker gets an opportunity to go wild and use whatever colors in whatever design they please.
Basic Knitted Tank Top
The backbone of this design is a simple knitted top. The construction of this top is similar to what I used to design my Rovie Chevron Knit Top. There are three main parts to the top: front panel, back panel, and the neckline. The basic stitches used in the pattern makes it a easy beginner knit top. The trickiest part would be learning how to add the stripes, however, I doubt anyone who has been in the fibre arts would have a difficult time with that. You got this! 🙂
Going back, the tank top is easily adjustable depending on the maker’s preference. The different parts and what is happening in the pattern are described in the PDF pattern. These little marks help you get a better idea where you can make adjustments.
Adding vertical stripes to the knitted tank top
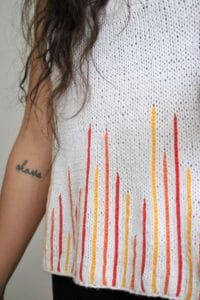
The pop of color is what makes the Bette Sunshine top so fun! Like I mentioned above, the vertical stripes are added after the construction of – at least – the front panel. Knowing how to embroider on knitted fabric allows you to turn any basic top into something truly unique! In the pdf pattern for the Bette Sunshine Design, I show you how to do the chain stitch with step by step pictures.
Substituting your yarn
This knitted tank top pattern uses the same yarn (Truboo) as last week’s design – Shane Pride Shirt. For this yarn, I recommend substituting with a CYC 3 (light) yarn. Trying to find a similar yarn that is bamboo or a bamboo blend would be ideal. There are acrylic yarns out there that feel very light and soft too. However, my bet would be getting a cotton or cotton blend yarn. For now, here are my top picks:
- Paintbox Yarn DK Lines – Paint box is one of my favorite yarn line’s our there because of their variety of colors. I have designed with their Simply DK and Cotton DK and love them both. Simply DK could also be a good alternative to use for the pattern and is very cost efficient being an acrylic fiber. If you are looking for cotton though, their Cotton Blend would be perfect! Their cotton DK comes in small balls so buying a ball per color for the rainbow stripes would be an option so you could get all the yarn you need in one line. Want to learn more about these yarns? See my reviews here for Simply DK and Cotton DK.
- Rico Baby cotton soft dk – this is a great substitute for the primary color don in Truboo however, the color variety in this yarn is limited, needing you to have the rainbow colors on hand. I used this yarn to make my Siffleur Top and I must say, it has great airflow, absorbent, and light.
- LBY Oh baby Organic Cotton – wanting a sustainable substitute? This would be a good choice for a more sustainable alternative for a cotton dk wieght yarn. Read more about my thought of Oh baby Organic Cotton Review here.
- King Cole Bamboo Cotton DK – This would be my top pick for substituting Truboo. Being a 50-50 Bamboo cotton yarn you get almost the same quality and texture as Truboo. I made my Lani Chevron Top with this yarn and would say it feels almost exactly the same as Truboo. They even have a color that is very close to what I used so check it out. Con? they do not have the colors needed for the stripes so you would need to have this on hand.
Now to the pattern!
Materials:
- 4.5mm knitting needles
- CYC 3 (light) yarn – I used Lion Brand yarn’s Truboo (3, 3, 3, 4, 4 balls respectively per size XS-XL)
- Tapestry needle
- Scissors
- Stitch Markers
Are you a visual learner? You can get the PDF pattern at low cost here on the site (cheapest option) or go to where you are familiar Etsy or Ravelry. Want everything you need plus the pattern?
Back Panel
Cast on 75 (85, 95, 105, 115) +6
Row 1: k in each st. 75 (85, 95, 105, 115)
Row 2: p in each st. 75 (85, 95, 105, 115)
Row 3-70 (78, 78, 86, 86): repeat rows 1 and 2 respectively, continue in stockinette. 75 (85, 95, 105, 115) per row.
Skip for XS and S
Row 79 (87, 87): k, k, k, ssk, ssk, ssk, k until last 9, k2tog, k2tog, k2tog, k, k, k. (89, 99, 109 sts)
S ONLY
Row 79: k, k, k, ssk, ssk, k until last 7, k2tog, k2tog, k, k, k. (81 sts)
Row 80: p, p, p, p2tog, p2tog, p until last 7, p2tog, p2tog, p, p, p. (77 sts)
M, L, XL Only
Row 80 (88, 88): p, p, p, p2tog, p2tog, p2tog, p until last 9, p2tog, p2tog, p2tog, p, p, p. (83, 93, 103)
Row 71 (81, 81, 89, 89): k, k, k, ssk, ssk, k until last 7, k2tog, k2tog, k, k, k. (71, 73, 79, 89, 99 sts)
Row 72 (82, 82, 90, 90): p, p, p, p2tog, p2tog, p until last 7, p2tog, p2tog, p, p, p. (67, 69, 75, 85, 95 sts)
For L and XL only
Row 91 (91): k, k, k, ssk, ssk, k until last 7, k2tog, k2tog, k, k, k. (81, 91 sts)
Row 92 (92): p, p, p, p2tog, p2tog, p until last 7, p2tog, p2tog, p, p, p. (77, 87 sts)
Row 73 (83, 83, 93, 93): k, k, k, ssk, k until last 5, k2tog, k, k, k. (65, 67, 73, 75, 85 sts)
Row 74 (84, 84, 94, 94): p, p, p, p2tog, p until last 5, p2tog, p, p, p. (63, 65, 71, 73, 83 sts)
Row 75 (85, 85, 95, 95): k, k, k, ssk ,k until last 5, k2tog, k, k, k. (61, 63, 69, 71, 81 sts)
Row 76 (86, 86, 96, 96): p, p, p, p2tog,k until last 5, p2tog, p, p, p. (59, 61, 67, 69, 79 sts)
Row 77 (87, 87, 97, 97): k, k, k, ssk, k until last 5, k2tog, k, k, k. (57, 59, 65, 67, 77 sts)
Row 78 (88, 88, 98, 98)- 107 (119, 119, 133, 133): continue in stockinette. (57, 59, 65, 67, 77 sts)
Row 108 (120, 120, 134, 134): p until 4 stitches before the first st marker. P2tog, p2tog. P, p, bo 11 stitches. This should end right after the last stitch marker. Sl st so you have two stitches on your right needle, yarn in front and insert left in the back loops of the two stitches on your right needle, p2tog, p2tog, p until end of the row. (21, 22, 25, 26, 31 sts per side)
Row 109 (121, 121, 135, 135): k until 4 sts before end. Ssk, ssk. (19, 20, 23, 24, 29 sts)
Row 110 (122, 122, 136, 136): p2tog, p2tog, p until end of the row. (17, 18, 21, 22, 27 sts)
Row 111 (123, 123, 137, 137): k until 4 sts before end. Ssk, ssk. (15, 16, 19, 20, 25 sts)
Skip for XS and S
Row 124, 138, 138): p2tog, p2tog, p until end of the row (17, 18, 23 sts)
Row 112 (124, 125, 139, 139) – 124 (136, 136, 152, 152): continue in stockinette (15, 16, 17, 18, 23 sts)
Row 125 (137, 137, 151, 151): bind off
Repeat from row 121 on other side of the knitted tank top, using k2tog rather than ssk.
Front Panel
Cast on 75 (85, 95, 105, 115) +6
Row 1: k in each st. 75 (85, 95, 105, 115)
Row 2: p in each st. 75 (85, 95, 105, 115)
Row 3-70 (78, 78, 86, 86): : repeat rows 1 and 2 respectively, continue in stockinette. 75 (85, 95, 105, 115) per row.
You are now going to begin shaping the armhole. If you added rows here in the back panel, add the same number of rows here before proceeding.
Row 71 (79, 79, 87, 87): k, k, k, ssk, ssk, ssk, k until last 9, k2tog, k2tog, k2tog, k, k, k. (69, 79, 89, 99, 109 sts)
Row 72 (80, 80, 88, 88): p, p, p, p2tog, p2tog, p2tog, p until last 9, p2tog, p2tog, p2tog, p, p, p. (63, 73, 83, 93, 103 sts)
Row 73 (81, 81, 89, 89): k, k, k, ssk, ssk, k until last 7, k2tog, k2tog, k, k, k. (59, 69, 79, 89, 99 sts)
XS ONLY
Row 74: p, p, p, p2tog, p until last 5 sts, p2tog, p, p, p. (57 sts)
Proceed to row 75.
Row 82 (82, 90, 90): p, p, p, p2tog, p2tog, p until last 7, p2tog, p2tog, p, p, p. (65, 75, 85, 95 sts)
Row 83 (83, 91, 91): k, k, k, ssk, ssk, k until last 7, k2tog, k2tog, k, k, k. (61, 71, 81, 91 sts)
S ONLY
Row 84: p, p, p, p2tog, p until last 5 sts, p2tog, p, p, p. (59 sts)
Proceed to row 85
Row 84 (92, 92): p, p, p, p2tog, p2tog, p until last 7, p2tog, p2tog, p, p, p. (67, 77, 87 sts)
L and XL ONLY
Row 93 (93): k, k, k, ssk, ssk, k until last 7, k2tog, k2tog, k, k, k. (73, 83 sts)
Row 94 (94): p, p, p, p2tog, p2tog, p until last 7, p2tog, p2tog, p, p, p. (69, 79 sts)
Row 75 (85, 85, 95, 95): k until 4 stitches before the first st marker. Ssk, ssk. k2, bo 11 stitches. This should end right after the last stitch marker. Sl st and knit the two stitches on the right needle together, k2tog, k until end of the row. (21, 24, 26, 28, 33 sts)
Row 76 (86, 86, 96, 96): p until 4 sts before end. p2tog, p2tog (19, 22, 24, 26, 31 sts)
Row 77 (87, 87, 97, 97): ssk, ssk, k until end of the row (17, 20, 22, 24, 29 sts)
Row 78 (88, 88, 98, 98): p until 4 sts before end. p2tog, p2tog (15, 18, 20, 22, 27 sts)
Skip for XS proceed to Row 78
Row 89 (89, 99, 99): ssk, ssk, k until end of the row (16, 18, 20, 25 sts)
For M ONLY
Row 90: p until last 2 sts, p2tog (17 sts)
For L and XL ONLY
Row 100 (100): p until last 4 sts, p2tog, p2tog (18, 23 sts)
Row 79 (90, 91, 101, 101) – 124 (136, 136, 150, 150): continue in stockinette (15, 16, 17, 18, 23 sts)
Row 125 (137, 137, 151, 151): Bind off Repeat from Row 86 on other side of the knitted tank top using k2tog rather than ssk.
Assemble your knitted tank top
- Seam the shoulder tops together.
- This pattern was made to have an extra 3 stitches on both sides for easy seaming. Count three stitches from the edges and seam the back panel to the front panel using the mattress stitch.
- Evenly pick up stitches around the neckline. Add a 4×4 ribbed border (or any ribbing of your choice) for 5 rows.
Now all that’s left is to style it in any way you choose! If you want to jazz up your knitted tank top and and a splash of color try grabbing the pattern for the Bette Sunshine Top here for detailed instructions on making your top and how to chain stitch the vertical rows.
Until next time friends! Happy making makers, see you again next week for another pride design!
xoxo
Abigail