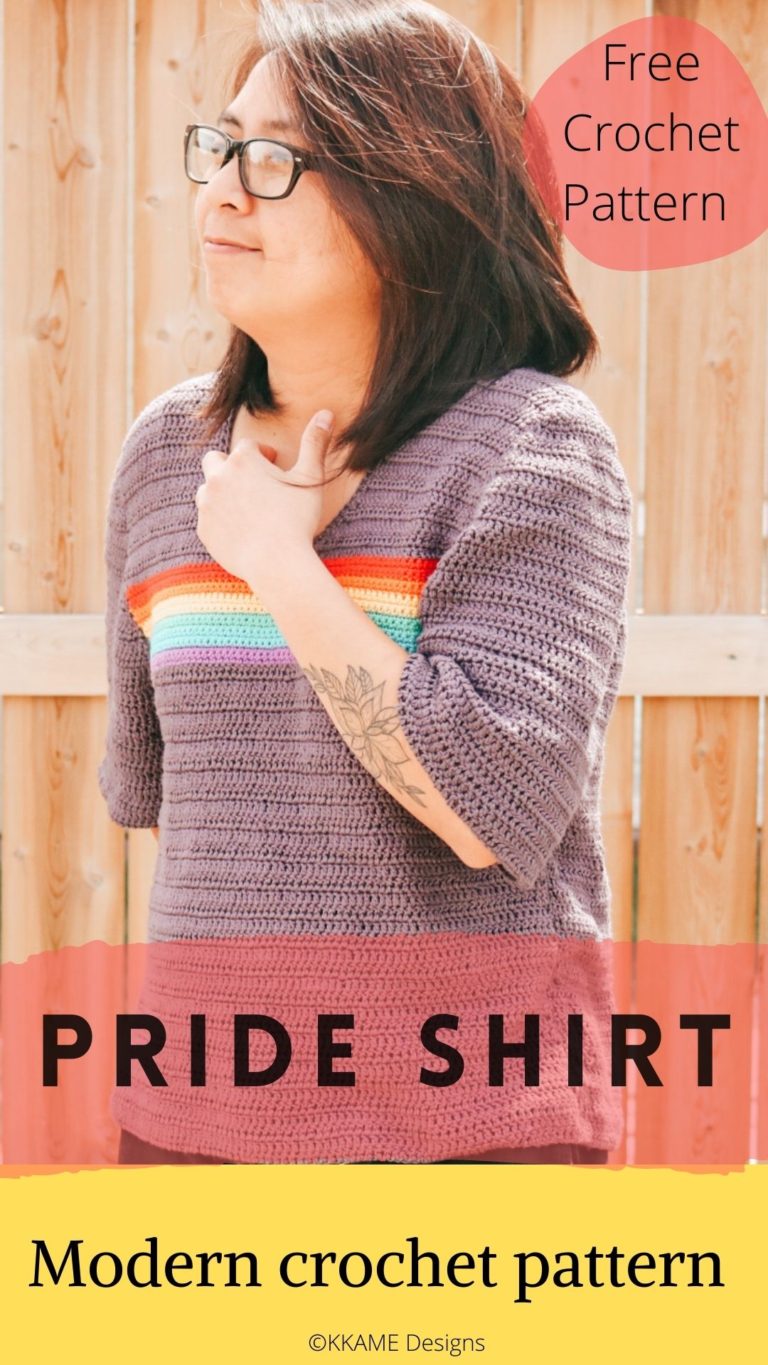
The Best Free Crochet Shirt Pattern for Pride Month
See more crochet top patterns in this list I curated filled with trendy:
Disclaimer: this post contains affiliate links. This means that I make a small commission from any purchase made through links – with no extra cost to the buyer. This allows me to keep making awesome and free content come your way.
Pride inspiration and design
Hello maker! There are so many things to be happy about in June. First off, it is the last month of the school year and I can’t wait to start summer vacation! That’s a real perk of working in the school system. Second, it’s pride month! As a member of the LGBTQ community, this month has always meant a lot to me.
My wife and I have been married for 4 years now. At one point, marriage seemed like an impossible thing. For me, pride month is more than just celebrating gender equality and human rights. Rather, is a reminder of love, possibility, courage, and happiness. These are the things I want you to feel when you rock your own pride tee!
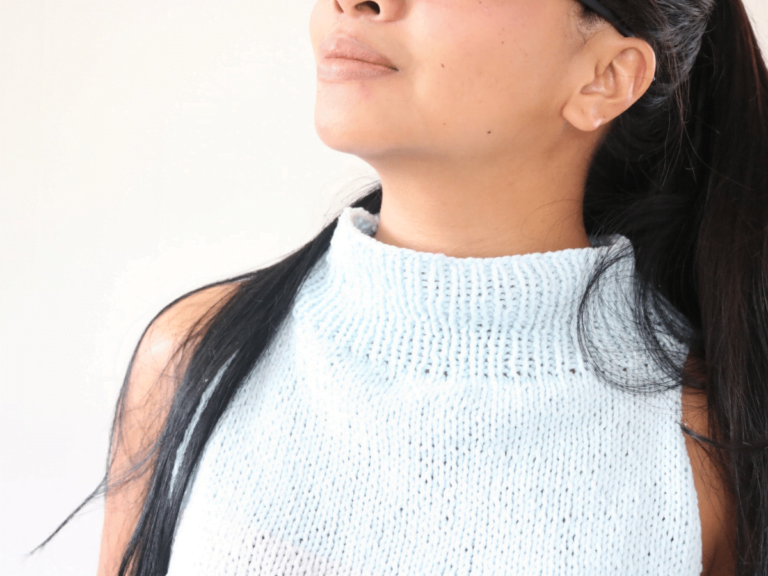
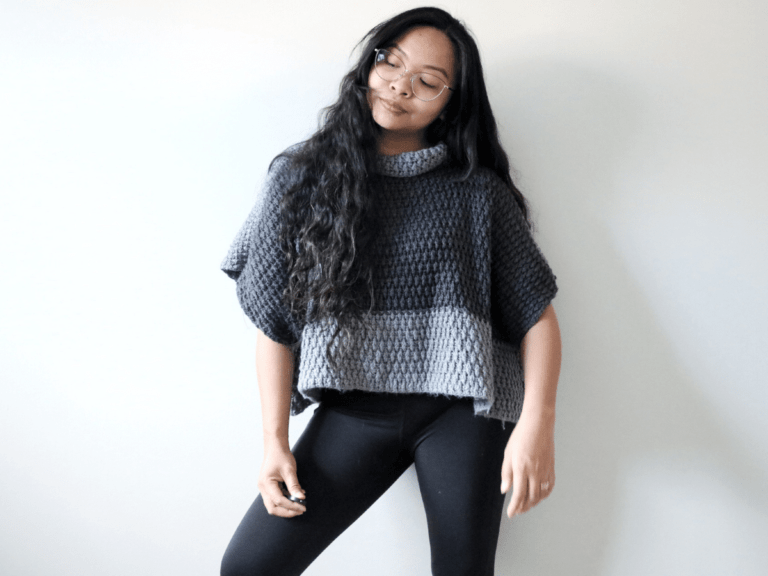
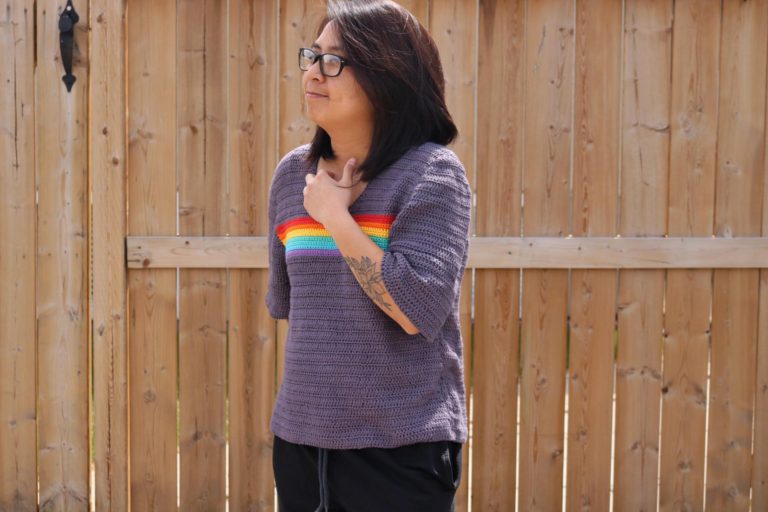
I made the crochet top design with all gender orientation in mind, as much as possible I wanted it to be a piece that would compliment a variety of people – I drew so much inspiration from the people in my life and thought “what can I make that almost anyone – regardless of gender – would wear?”. It did not take too long to figure out that I wanted a crochet shirt with a loose silhouette – everyone loves a good loose shirt right? I also settled on boxed sleeves that are wider and larger than regular shirt sleeves. Finally, a simple crochet pride flag of rainbow stripes in the mid chest section would complete the look.
To my surprise, my wife agreed to model for me when I finished the design – without complaints! This was a huge indicator for me that this design met my vision of being gender neutral crochet design. Shout out to my wife for being such a great sport!
Fully adaptable crochet shirt sizes for every-body!
I definitely wanted the design to not only be gender neutral but a piece for every-body! The pdf pattern of this crochet tee includes instructions on how to make adjustments for the best fit for you. This post shows you how to make the shirt in XS-XL sizes following the size standards on Craft Yarn Council. The pdf version provides you with a table of the main measurements used in the design as well.
As a designer, I see it is so important to be inclusive. However, math just drives me crazy!! This month, my goal is to start taking extra time in my design process to be more size inclusive. Do you want to be a part of that? If you are a plus size crochet fanatic and want to test my patterns, fill out the form here.
Summer friendly yarn choice
June marks the start of summer. Actually, while I am typing this, we are in the midst of a heat wave! I swear, Calgary has the most extreme and random weather – it was just snowing last week! Any who, warm weather calls for light and breathable yarn. I have tried lots of cotton based light weight yarn in the past, but I think I found my new go-to with this project.
For this crochet shirt I chose to use Lion Brand Yarn’s Truboo for the body and Bonbon’s for the rainbow design. Bonbon’s are great for little splashes of color without needing to purchase a whole skein of yarn. This yarn choice was absolutely perfect because of it’s properties of being light weight and 100% bamboo which helps retain moisture keeping you cool and dry.
Substituting your yarn
For this pattern, I recommend substituting yarn with a CYC 3 (light) yarn. Trying to find a similar yarn that is bamboo or a bamboo blend would be ideal. There are acrylic yarns out there that feel very light and soft too. However, my bet would be getting a cotton or cotton blend yarn. For now, here are my top picks:
- Paintbox Yarn DK Lines – Paint box is one of my favorite yarn line’s our there because of their variety of colors. I have designed with their Simply DK and Cotton DK and love them both. Simply DK could also be a good alternative to use for the pattern and is very cost efficient being an acrylic fiber. If you are looking for cotton though, their Cotton Blend would be perfect! Their cotton DK comes in small balls so buying a ball per color for the rainbow stripes would be an option so you could get all the yarn you need in one line. Want to learn more about these yarns? See my reviews here for Simply DK and Cotton DK.
- Rico Baby cotton soft dk – this is a great substitute for the primary color don in Truboo however, the color variety in this yarn is limited, needing you to have the rainbow colors on hand. I used this yarn to make my Siffleur Top and I must say, it has great airflow, absorbent, and light.
- LBY Oh baby Organic Cotton – wanting a sustainable substitute? This would be a good choice for a more sustainable alternative for a cotton dk wieght yarn. Read more about my thought of Oh baby Organic Cotton Review here.
- King Cole Bamboo Cotton DK – This would be my top pick for substituting Truboo. Being a 50-50 Bamboo cotton yarn you get almost the same quality and texture as Truboo. I made my Lani Chevron Top with this yarn and would say it feels almost exactly the same as Truboo. They even have a color that is very close to what I used so check it out. Con? they do not have the colors needed for the stripes so you would need to have this on hand.
The Shane Pride Crochet Shirt Pattern
* Let’s get to it! As mentioned above, you will find the free crochet shirt pattern here in sizes XS-XL. To test my plus size options, fill out the application here.
Find the PDF pattern here to get extra instructions and pictures to make your crochet shirt.
Purchase the kit here for all the yarn I used and pdf pattern.
Materials:
- Primary color: Truboo Slate 873-150 (5, 5, 5, 6, 7 balls)
- Secondary color: Bonbons Beach 601-630 (1 pack)
- 3.5mm crochet hook
- Scissors
- Tapestry Needle
Front Panel
Ch 75 (85, 95, 105, 115) +2
Row 1: dc into the third ch from hook (counts as 2 dc), dc into each ch down the row. (75, 85, 95, 105, 115 sts)
Row 2-27(30, 30, 33, 33): ch 2, dc in each st down the row. (75, 85, 95, 105, 115 sts)
Skip XS
Row 31 (31, 34, 34): dc2tog, dc2tog, dc2tog, dc2tog, dc until last 8 sts, dc2tog, dc2tog, dc2tog, dc2tog (77, 87, 97, 107 sts)
Row 28(32, 32, 35, 35): dc2tog, dc2tog, dc2tog, dc until last 6 sts, dc2tog, dc2tog, dc2tog. (69, 71, 81, 91, 101 sts)
XL ONLY
Row 36: dc2tog, dc2tog, dc2tog, dc until last 6 sts, dc2tog, dc2tog, dc2tog. (95 sts)
Row 29(33, 33, 36, 37): dc2tog, dc2tog, dc until last 4 sts, dc2tog, dc2tog. (65, 67, 77, 87, 91 sts)
Row 30(34, 34, 37, 38): dc2tog, dc until last 2 sts, dc2tog. (63, 65, 75, 85, 89 sts)
Row 31(35, 35, 38, 39): dc2tog, dc until last 2 sts, dc2tog. (61, 63, 73, 83, 87 sts)
Start Rainbow Stripe Section
This pattern requires you to change colors. See my post about how to seamlessly change colors in crochet to get that flawless transition.
Row 32-34(36-38, 36-38, 39-41, 40-42): ch 1, sc in each stitch with purple. (61, 63, 73, 83, 87 sts)
Row 35-37(39-41, 39-41, 42-44, 43-45): ch 1, sc in each stitch with blue. (61, 63, 73, 83, 87 sts)
Row 38-40(42-44, 42-44, 45-47, 46-48): ch 1, sc in each stitch with green. (61, 63, 73, 83, 87 sts)
Row 41-43(45-47, 45-47, 48-50, 49-51): ch 1, sc in each stitch with yellow(61, 63, 73, 83, 87 sts)
Row 44-46(48-50, 48-50, 51-53, 52-54): ch 1, sc in each stitch with orange. (61, 63, 73, 83, 87 sts)
Row 47-49(51-53, 51-53, 54-56, 55-57): ch 1, sc in each stitch with red. (61, 63, 73, 83, 87 sts)
Switch back to primary color
Row 50(54, 54, 57, 58): ch 2, dc in each st along the row. (61, 63, 73, 83, 87 sts)
Begin this area by marking the middle of the row. Count 5 sts on both side of the middle and mark.
Row 51(55, 55, 58, 59): ch 2, dc in each st until 4 sts before the stitch marker, dc2tog, dc2tog. (23, 24, 29, 34, 36 sts)
Row 52(56, 56, 59, 60): dc2tog dc2tog, dc until end of the row (21, 22, 27, 32, 34 sts)
Row 53(57, 57, 60, 61): ch 2, dc in each st until last 2 sts, dc2tog. (20, 21, 26, 31, 33 sts)
Row 54(58, 58, 61, 62): dc2tog, d until end of the row. (19, 20, 25, 30, 32 sts)
Row 55(59, 59, 62, 63)-65(70, 70, 73, 73): dc in each st (19, 20, 25, 30, 32 sts)
Fasten off
Back Panel
Ch 75 (85, 95, 105, 115) +2
Row 1: dc into the third ch from hook (counts as 2 dc), dc into each ch down the row. (75, 85, 95, 105, 115 sts)
Row 2-27(30, 30, 33, 33): ch 2, dc in each st down the row. (75, 85, 95, 105, 115 sts)
Row 28(31, 31, 34, 34): dc2tog, dc2tog, dc until last 4 sts, dc2tog, dc2tog (71, 81, 91, 101, 111 sts)
Row 29(32, 32, 35, 35): dc2tog, dc2tog, dc until last 4 sts, dc2tog, dc2tog (67, 77, 87, 97, 107 sts)
STOP for XS and proceed to Row 30
Row 33(33, 36, 36): dc2tog, dc2tog, dc until last 4 sts, dc2tog, dc2tog. (73, 83, 93, 103 sts)
Row 34(34, 37, 37): dc2tog, dc2tog, dc until last 4 sts, dc2tog, dc2tog (69, 79, 89, 99 sts)
XL ONLY
Row 38: dc2tog, dc2tog, dc until last 4 sts, dc2tog, dc2tog (95 sts)
Row 30(35,35, 38, 39): dc2tog, dc until last 2 sts, dc2tog. (65, 77, 77, 87, 93 sts)
Row 31(36, 36, 39, 40): dc2tog, dc until last 2 sts, dc2tog. (63, 75, 75, 85, 91 sts)
Row 32(37, 37, 40, 41): dc2tog, dc until last 2 sts, dc2tog. (61, 73, 73, 83, 89 sts)
XL ONLY
Row 42: dc2tog, dc until last 2 sts, dc2tog. (87 sts)
Row 33-43(38-48, 38-48, 41-51, 43-51): dc in each st along the row. (61, 73, 73, 83, 87 sts)
You are now going to start shaping the back neckline. Decreases are done only on neckline area. Begin this area by marking the middle of the row. Count 5 sts on both side of the middle and mark.
Row 44(49, 49, 52, 52): ch 2, dc in each st until 4 sts before the stitch marker, dc2tog, dc2tog. (23, 24, 29, 34, 36 sts)
Row 45(50, 50, 53, 53): dc2tog dc2tog, dc until end of the row (21, 22, 27, 32, 34 sts)
Row 46(51, 51, 54, 54): ch 2, dc in each st until last 2 sts, dc2tog. (20, 21, 26, 31, 33 sts)
Row 47(52, 52, 55, 55): dc2tog, d until end of the row. (19, 20, 25, 30, 32 sts)
Row 48(53, 53, 56, 56)-51(56, 56, 59, 59): dc in each st (19, 20, 25, 30, 32 sts)
Fasten off
Sleeves
Ch 64 (66, 70, 74, 82) + 2
Row 1: dc into third ch from hook, dc into each st. (64, 66, 70, 74, 82 sts)
Rows 2-15: dc into each st along the row. (64, 66, 70, 74, 82 sts)
Row 16: dc2tog, dc2tog, dc until last 4 sts, dc2tog, dc2tog. (60, 62, 66, 70, 78 sts)
Row 17: dc2tog, dc2tog, dc until last 4 sts, dc2tog, dc2tog. (56, 58, 62, 66, 74 sts)
Row 18: dc2tog, dc2tog, dc until last 4 sts, dc2tog, dc2tog. (52, 54, 58, 62, 70 sts)
Row 19: dc2tog, dc2tog, dc until last 4 sts, dc2tog, dc2tog. (48, 50, 54, 58, 66 sts)
Row 20: dc2tog, dc2tog, dc until last 4 sts, dc2tog, dc2tog. (44, 46, 50, 54, 62 sts)
L and XL Only
Row 21: dc2tog, dc2tog, dc until last 4 sts, dc2tog, dc2tog. (50, 58sts)
XL Only
Row 22: dc2tog, dc2tog, dc until last 4 sts, dc2tog, dc2tog. (54 sts)
Row 21 (21, 21, 22, 23): dc2tog, dc until last 2 sts, dc2tog. (42, 44, 48, 48, 52 sts)
Row 22 (22, 22, 23, 24): dc2tog, dc until last 2 sts, dc2tog. (40, 42, 46, 46, 50sts)
Row 23 (23, 23, 24, 25): dc2tog, dc until last 2 sts, dc2tog. (38, 40, 44, 44, 48 sts)
Row 24 (24, 24, 25, 26): dc2tog, dc until last 2 sts, dc2tog. (36, 38, 42, 42, 46 sts)
Row 25 (25, 25, 26, 27: dc2tog, dc until last 2 sts, dc2tog. (34, 36, 40, 40, 44 sts)
STOP for XS and proceed to Row 26
Row 26 (26, 27, 28): dc2tog, dc until last 2 sts, dc2tog. (34, 38, 38, 42 sts)
STOP for S and proceed to Row 27
Row 27 (28, 29): dc2tog, dc until last 2 sts, dc2tog. (36, 36, 40 sts)
Row 28 (29, 30): dc2tog, dc until last 2 sts, dc2tog. (34, 34, 38 sts)
XL Only
Row 31: dc2tog, dc until last 2 sts, dc2tog. (36 sts)
Row 32: dc2tog, dc until last 2 sts, dc2tog. (34 sts)
Row 26 (27, 29, 30, 33): dc2tog, dc2tog, dc until last 4 sts, dc2tog, dc2tog. (30, 30, 30, 30, 30 sts)
Row 27 (28, 30, 31, 34): dc2tog, dc2tog, dc until last 4 sts, dc2tog, dc2tog. (26, 26, 26, 26, 26 sts)
Row 28 (29, 31, 32, 35): dc2tog, dc2tog, dc until last 4 sts, dc2tog, dc2tog. (22, 22, 22, 22, 22 sts)
Row 29 (30, 32, 33, 36): dc2tog, dc2tog, dc until last 4 sts, dc2tog, dc2tog. (18, 18, 18, 18, 18 sts)
Row 30 (31, 33, 34, 37): dc2tog, dc2tog, dc until last 4 sts, dc2tog, dc2tog. (14, 14, 14, 14, 14 sts)
Row 31 (32, 34, 35, 38): dc2tog, dc2tog, dc until last 4 sts, dc2tog, dc2tog. (10 sts)
Assembly
Made a mistake? You might find this post about fixing crochet handy.
1.Lay the front panel on the back panel, wrong sides together. Seam the shoulder parts together using a whip stitch.
2.Take one sleeve and locate the middle of the top. Align with where you seamed the shoulder in step 1 and mark.
3.Locate the rows on both panels where the armpit portion starts and mark.
4.Seam from the mid portion marked in step 2 down to the marker in step 3 for both sides (fig 1).
5.Lay the garment flat where the sleeve is set and the front panel lays on the back panel. Align the bottom of the panels together, seam up the side to the armpit then down the sides of the sleeve (fig 2).
6.Repeat on opposite side
7.Single Crochet around the neckline (fig 3).
8.Weave in all ends
And that’s all there is to it! I would love to see you spread the love and joy in your pride shirt. Tag me on IG @knitsandknotsbyame. Remember to take time this splendid month to celebrate the good and beautiful things in life. Most importantly, be proud to be YOU. Leave a comment below if you love this pattern and let me know what other things you would like to see.
Until next time my maker friend,
Xoxo
Abigail