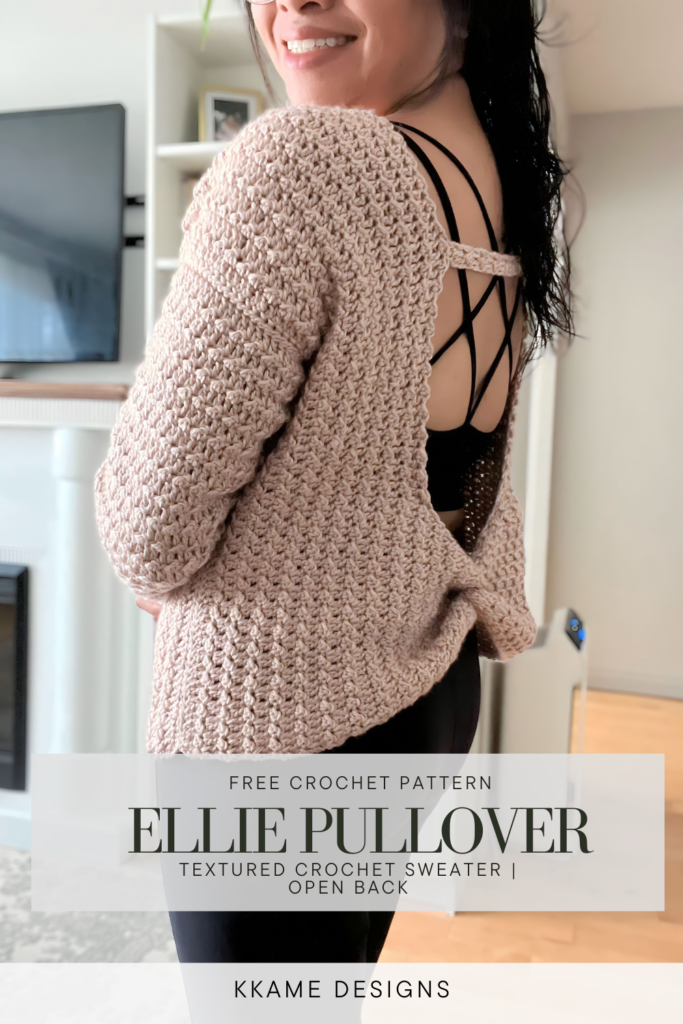
How to Crochet a Super Comfy and Stylish Open Back Sweater this Fall
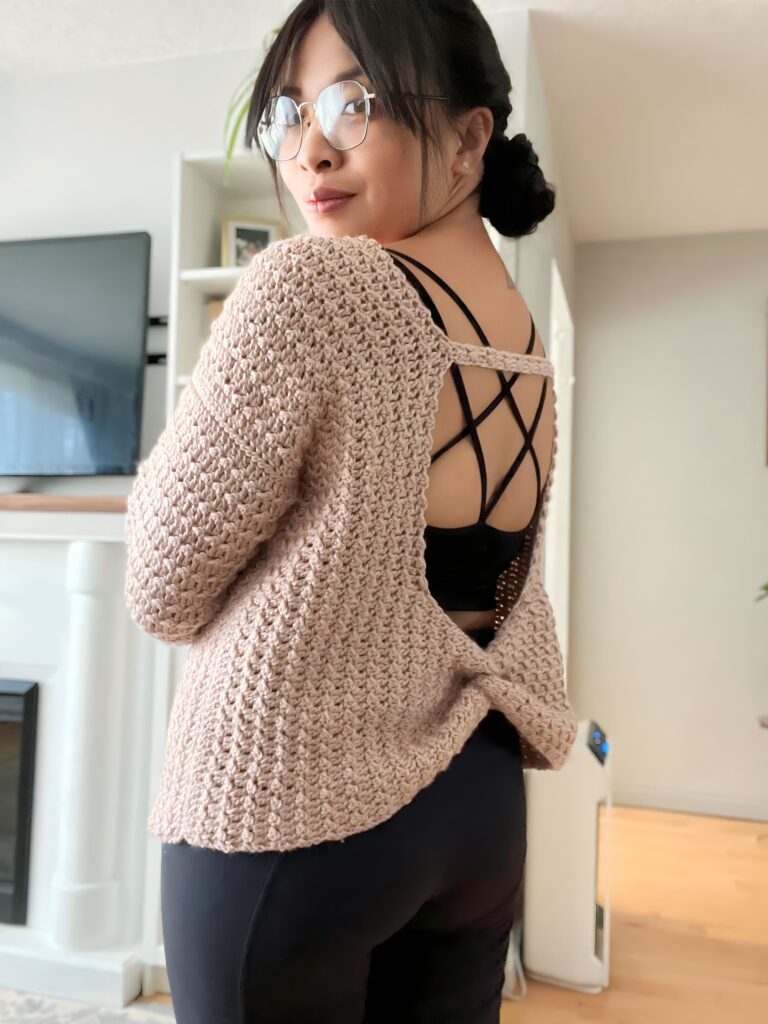
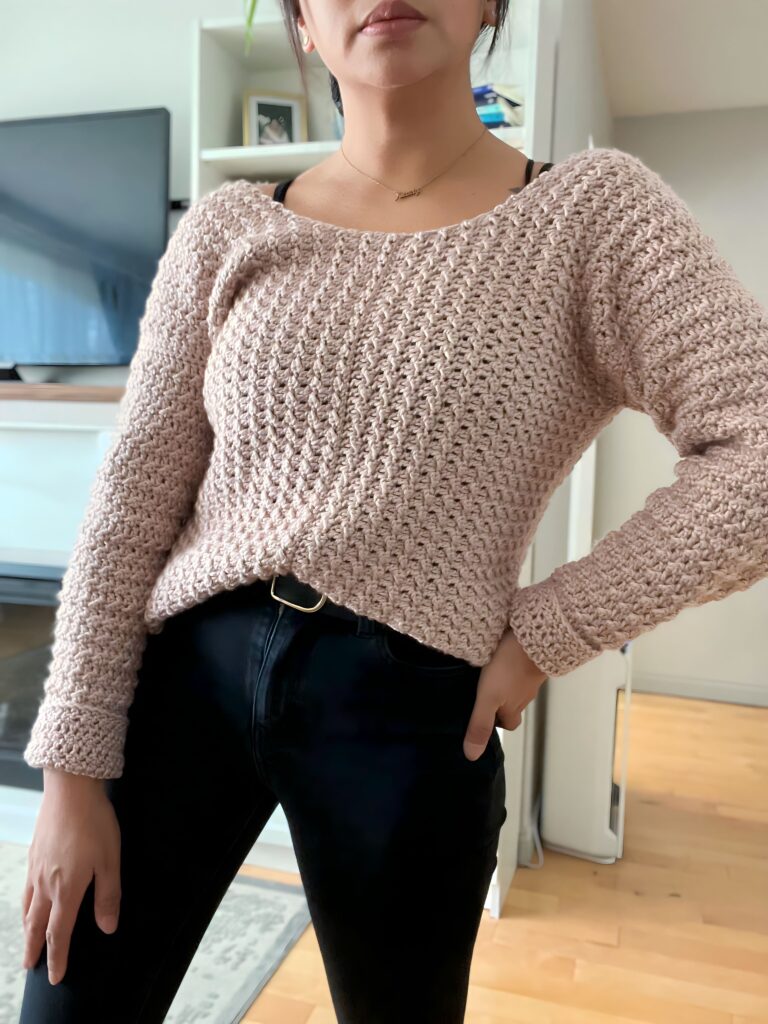
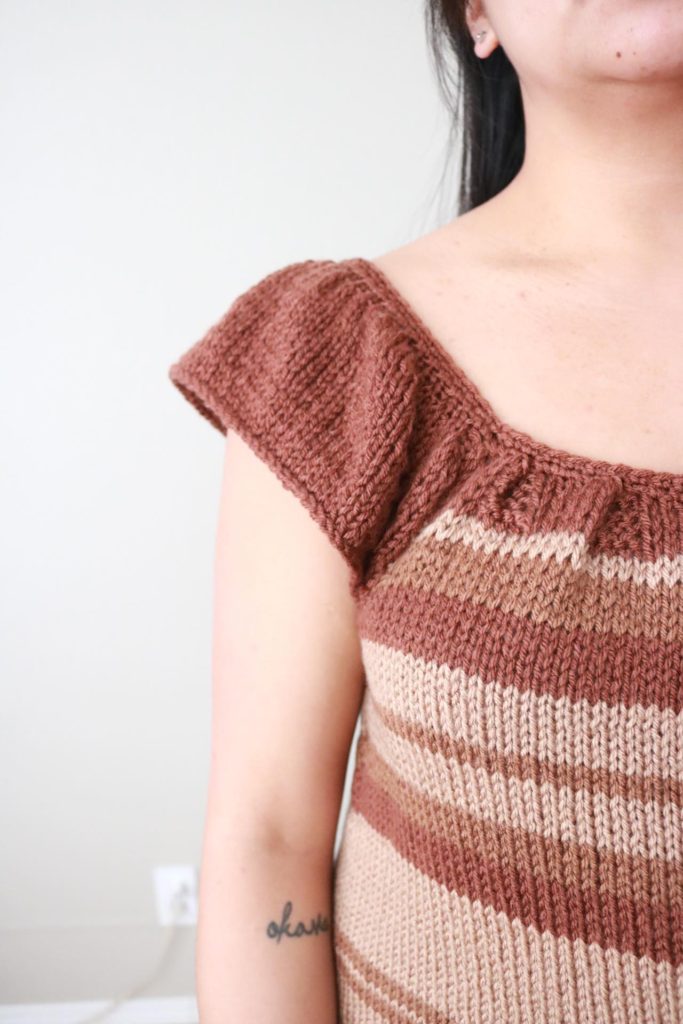
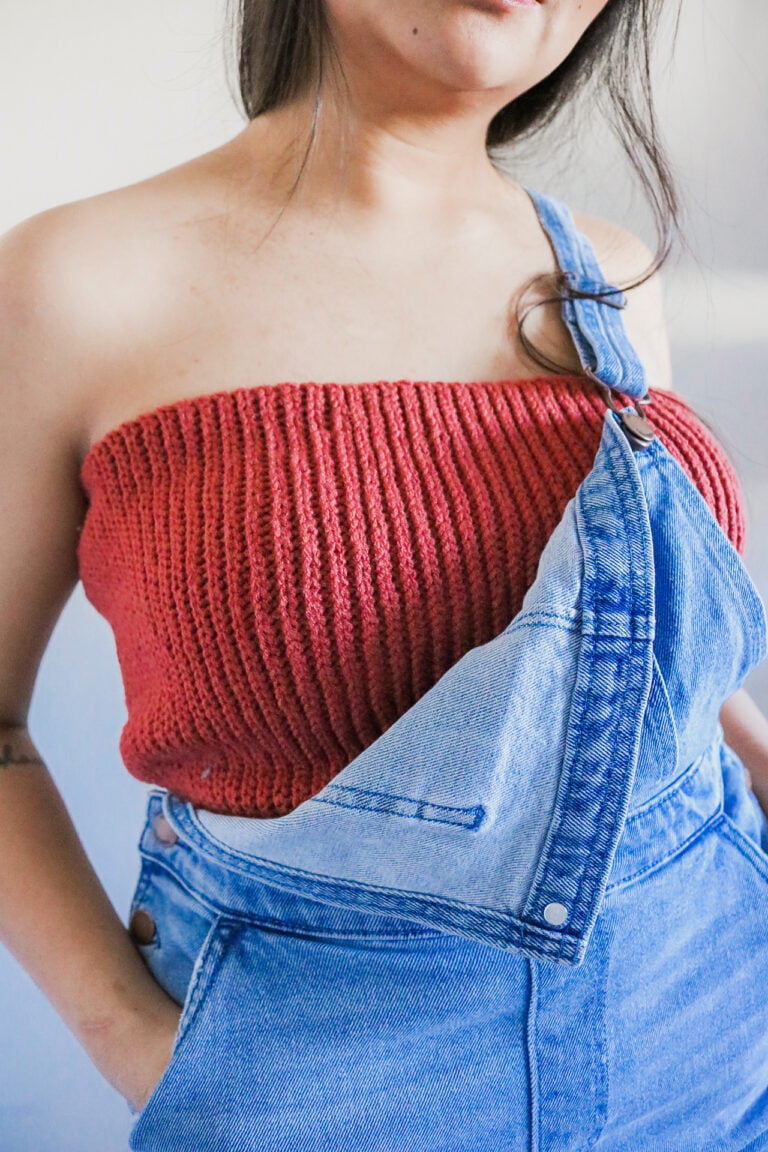
Hello my maker friend! I am so excited to share with you my latest design, The Ellie Pullover! This crochet sweater features an open back and textured stitches. It is perfect for transition months and has quickly become my go to sweater this fall because of the unpredictable weather patterns.
Want to create you own handmade wardrobe? I put together this list of free crocheted sweater patterns so you do not have to spend hours looking for your next project.
This post contains affiliate links. I get a small commission from any purchase made through these links at no additional cost to the buyer. This allows me to keep free awesome content coming your way. Check out my privacy policy for a full rundown of disclosures.
Get the inexpensive ad-free pattern for this pattern here. The paid pattern includes step-by-step instructions and picture tutorials to help you with your open back crochet sweater.
About this modern crochet sweater
Fun fact! The Ellie Pullover was made almost entirely on a plane! That is both the flights to and from Calgary to the Maritimes. I named the pullover after Ellie, the main character in the show I was watching (The Last of Us) during the plane rides haha I know I know! I have the hardest times thinking of names.
The concept for this open back pullover was something that has been on my mind for a while. My very first crochet design was an open back crochet tank top actually. So I just really love open back designs. I was watching a show and saw an open back sweater and knew now was the time to design one!
Over the years I have grown to really enjoy designing with textured stitches so to the books I went! For this open back crochet sweater I chose a simple textured stitch to use all throughout to make it easy for advanced beginners to try.
Construction of this open back crochet sweater
The Ellie Pullover is made using a side to side construction in 5 different sections: left side, right side, back strap, and two sleeves.
Each side was strategically designed to highlight the chosen stitch with the two panels seamed down the centre front. The tie in the back of the open back crochet sweater uses a twist tie technique that is measured to be placed 1/3 of the the persons back.
The pullover incorporates a drop sleeve construction wherein part of the body/shoulder accounts for some of the sleeve. This type of construction makes it very simple with minimal shaping.
Want more fall designs?
Related Post: Check out this curated list of sweater patterns to make this year
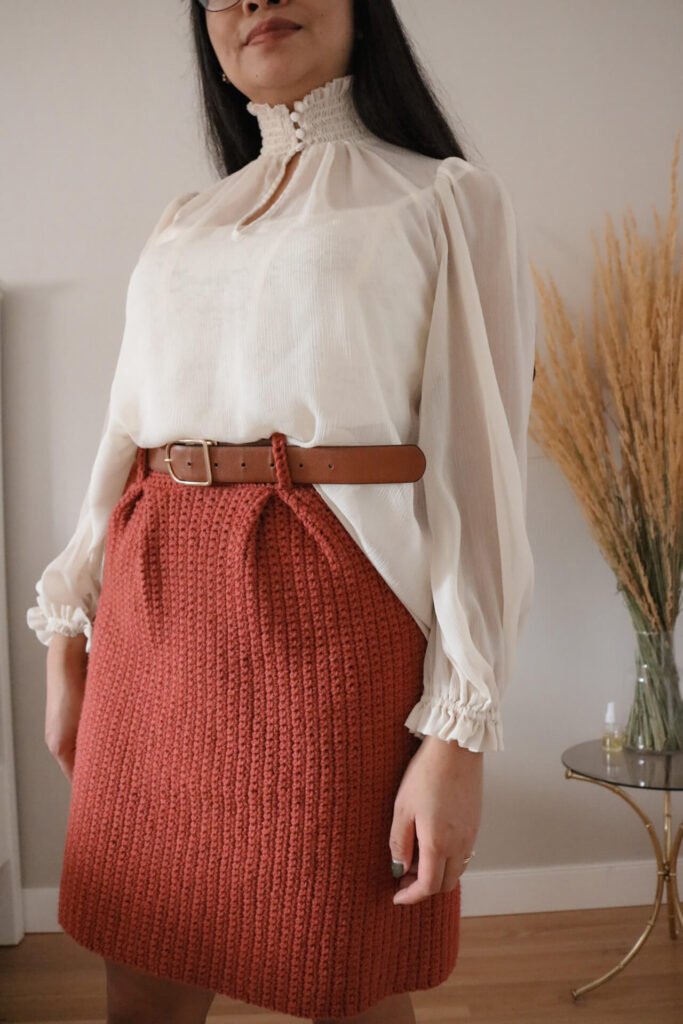
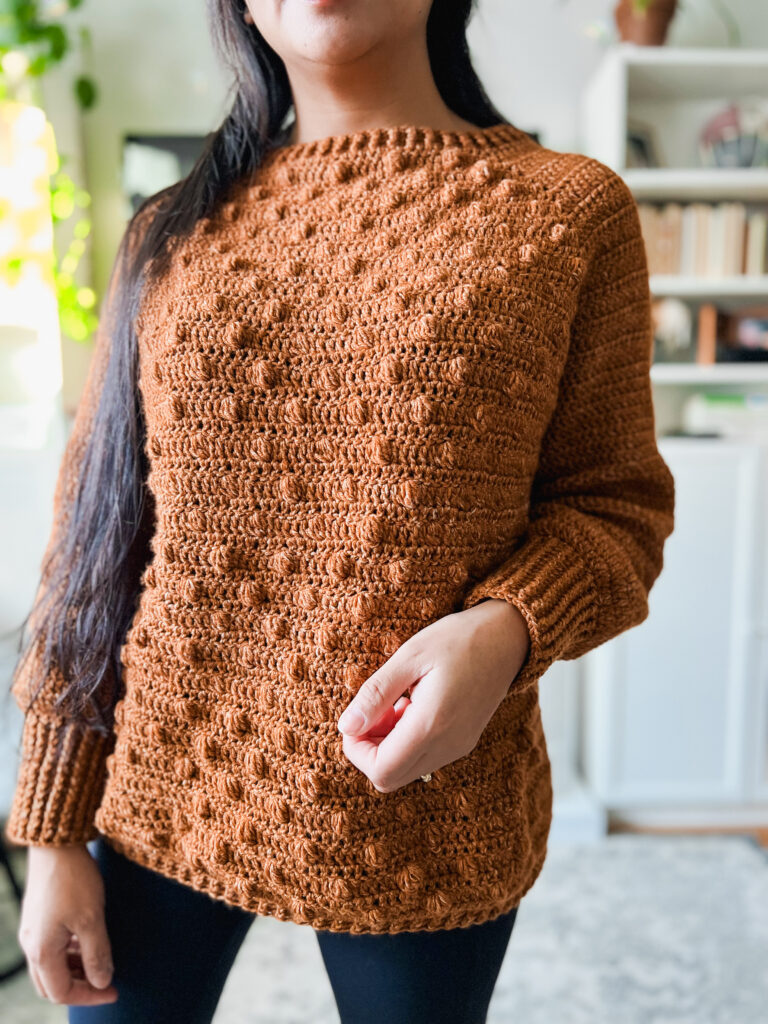
Check out these patterns (left to right): Norquay Skirt and the Puffin Pullover
Yarn
For this open back crochet sweater I used Lion Brand Yarn’s Skein Tones in the colorway Birch. The yardage for this pullover is XS-5X (5, 6, 6, 7, 7)( 8, 8, 9, 10) balls respectively.
I enjoy working with Skein Tones. Skein Tones is a sub collection under Lion Brand Yarn’s Basic Stitch Anti Pilling yarn. Basic Stitch Anti Pilling yarn is a versatile yarn that is made specifically for general use items to withstand wear and tear. Skein Tones is a variety of neutral colours that aims to compliment a number of complexions. This line is always in the works and continuously developing and adding different shades.
One thing I love most about this yarn is its natural drape. Even when you hold a skein it kind of just flops down haha the yarn also has a great sheen to it making it have a nice glossy look.
See all of my designs with this yarn below:
Modern Crochet Sweater Pattern with an Open Back – Ellie Pullover
First off, this is a free crochet pattern for the Ellie Pullover. Due to the length of the pattern I have only included the complete pattern for Medium, the other sizes 2X-5X can be found in the premium ad-free pattern. The PDF pattern includes extra picture tutorials for visual learners too. This pattern is for personal use only.
Pattern notes:
- This pattern is made using US terminology.
- The pattern is written in rows. The ch stitches at the beginning of the rows are considered in stitch count.
- Decreases in this pattern are made in dc (odd) rows.
- Picture shows a 5’2 female wearing a size medium with no modifications to the pattern.
Materials:
- CYC 4 Yarn (I used Lion Brand Yarn’s Skein Tones in Birch)
- 4.0mm crochet Hook
- Scissors
- Needle
Gauge – Do not forget to make your gauge!
16sts x 11 rows of stitch pattern below:
Ch 24+2
R1: dc into 4th ch from hook (ch 2 counted as a st), dc in each ch down the row (24 sts)
R2: ch 2, slst. *dc, slst. Repeat from * until end of the row (24 sts)
R3-13: repeat R2 and R3 respectively
Abbreviations:
- Ch – Chain
- Fdc – foundation chain double crochet
- Dc – double crochet
- Dc2tog – double crochet two together
- Slst – slip stitch
- RS – right side
Sizes and finished measurements
| Size | XS | S | M | L | XL | 2X | 3X | 4X | 5X |
| Length | 19.25 | 19.75 | 20 | 20.25 | 20.75 | 21 | 21 | 21.5 | 21.5 |
| Bust accounting 2” ease | 32 | 36 | 40 | 44 | 48 | 52 | 56 | 60 | 64 |

Let’s start making your open back crochet sweater
NOTE: The pattern is written following sizes XS(S,M,L,XL)(2X,3X,4X,5X)
Panel 1
R1: Fdc 154 (158, 160, 162, 166)(168, 168, 172, 172)
R2: ch 2 (considered first st throughout pattern), slst in next st. * dc, slst. Repeat from * down the row. (154, 158, 160, 162, 166)(168, 168, 172, 172) sts
R3: ch 2, dc in each st down the row. (154, 158, 160, 162, 166)(168, 168, 172, 172) sts
R4- 14 (16, 20, 22, 24)(26, 28, 32, 34): repeat R2 and R3 respectively. (154, 158, 160, 162, 166)(168, 168, 172, 172) sts
Mark the center of the strip. This should show 77 (79, 80, 81, 83)(84, 84, 86, 86) sts on both sides.
R15 (17, 21, 23, 25)(27, 29, 33, 35): ch 2, dc until last 15 sts to the marker (halfway point). dc2tog, dc2tog, dc2tog, dc. (66, 68, 69, 70, 72)(73, 73, 75, 75) sts
R16 (18, 22, 24, 26)(28, 30, 34, 36): ch 2, slst in next st. * dc, slst. Repeat from * down the row. (66, 68, 69, 70, 72)(73, 73, 75, 75) sts
R17 (19, 23, 25, 27)(29, 31, 35, 37): ch 2, dc until last 5 sts. dc2tog, dc2tog, dc. (64, 66, 67, 68, 70)(71, 71, 73, 73) sts
R18 (20, 24, 26, 28)(30, 32, 36, 38) – 21 (23, 27, 30, 32)(35, 37, 41, 43): repeat R2 and R3 respectively. (64, 66, 67, 68, 70)(71, 71, 73, 73) sts
Fasten off
With the RS facing you, count 24 (26, 28, 28, 28)(28, 28, 29, 29) sts from the opposite edge and attach yarn. Proceed with pattern as if continuing the row
R15 (17, 21, 23, 25)(27, 29, 33, 35): ch 2, dc2tog, dc2tog, dc2tog, dc in each st down the row. (21, 23, 25, 25, 25)(25, 25, 26, 26) sts
R16 (18, 22, 24, 26)(28, 30, 34, 36): ch 2, slst in next st. * dc, slst. Repeat from * down the row.(21, 23, 25, 25, 25)(25, 25, 26, 26) sts
R17 (19, 23, 25, 27)(29, 31, 35, 37): ch 2, dc2tog, dc2tog, dc in each st down the row. (19, 21, 23, 23, 23)(23, 23, 24, 24) sts
R18 (20, 24, 26, 28)(30, 32, 36, 38): ch 2, slst in next st. * dc, slst. Repeat from * down the row.(19, 21, 23, 23, 23)(23, 23, 24, 24) sts
R19 (21, 25, 27, 29)(31, 33, 37, 39): ch 2, dc2tog, dc in each st down the row. (18, 20, 22, 22, 22)(22, 22, 23, 23) sts
R20 (22, 26, 28, 30)(32, 34, 38, 40) – 25 (27, 30, 33, 36)(38, 41, 44, 47): repeat R2 and R3 respectively.(18, 20, 22, 22, 22)(22, 22, 23, 23) sts
Fasten off
Panel 2
R1: Fdc 154 (158, 160, 162, 166)(168, 168, 172, 172)
R2: ch 2 (considered first st throughout pattern), slst in next st. * dc, slst. Repeat from * down the row. (154, (158, 160, 162, 166)(168, 168, 172, 172) sts
R3: ch 2, dc in each st down the row. (154, (158, 160, 162, 166)(168, 168, 172, 172) sts
R4- 14 (16, 20, 22, 24)(26, 28, 32, 34): repeat R2 and R3 respectively. (154, (158, 160, 162, 166)(168, 168, 172, 172) sts
R15 (17, 21, 23, 25)(27, 29, 33, 35): ch 2, dc in next 17 (19, 21, 21, 21)(21, 21, 22, 22) sts. dc2tog, dc2tog, dc2tog, dc in next st. (21, 23, 25, 25, 25)(25, 25, 26, 26) sts
R16 (18, 22, 24, 26)(28, 30, 34, 36): ch 2, slst in next st. * dc, slst. Repeat from * down the row. (21, 23, 25, 25, 25)(25, 25, 26, 26) sts
R17 (19, 23, 25, 27)(29, 31, 35, 37): ch 2, dc until last 5 sts sts. dc2tog, dc2tog, dc in last st. (19, 21, 23, 23, 23)(23, 23, 24, 24) sts
R18 (20, 24, 26, 28)(30, 32, 36, 38): ch 2, slst in next st. * dc, slst. Repeat from * down the row.(19, 21, 23, 23, 23)(23, 23, 24, 24) sts
R19 (21, 25, 27, 29)(31, 33, 37, 39): ch 2, dc until last 3 sts sts. dc2tog, dc in last st. (18, 20, 22, 22, 22)(22, 22, 23, 23) sts
R20 (22, 26, 28, 30)(32, 34, 38, 40) – 25 (27, 30, 33, 36)(38, 41, 44, 47): repeat R2 and R3 respectively.(18, 20, 22, 22, 22)(22, 22, 23, 23) sts
Fasten off
With the RS facing you, mark the middle of the strip. Mark the center of the strip. This should show 77 (79, 80, 81, 83)(84, 84, 86, 86) sts on both sides.
On the left half, count 8 sts from mid marker and attach yarn. Proceed with pattern as if continuing the row
R15 (17, 21, 23, 25)(27, 29, 33, 35): ch 2, dc2tog, dc2tog, dc2tog, dc in each st down the row. (66, 68, 69, 70, 72)(73, 73, 75, 75) sts
R16 (18, 22, 24, 26)(28, 30, 34, 36): ch 2, slst in next st. * dc, slst. Repeat from * down the row.(66, 68, 69, 70, 72)(73, 73, 75, 75) sts
R17 (19, 23, 25, 27)(29, 31, 35, 37): ch 2, dc2tog, dc2tog, dc in each st down the row. (64, 66, 67, 68, 70)(71, 71, 73, 73) sts
R18 (20, 24, 26, 28)(30, 32, 36, 38) – 22 (24, 28, 31, 33)(36, 38, 42, 44): repeat R2 and R3 respectively. (64, 66, 67, 68, 70)(71, 71, 73, 73) sts
Fasten off with a tail a little over 2x the length of the last row
Sleeves (make 2)
Only size Medium is shown in this free pattern. You can access the extended size list in the premium pattern.
R1: Fdc 28
R2: ch 2, slst in next st. * dc, slst. Repeat from * down the row. (28 sts)
R3: ch 2, 2dc, dc in each st until last 2 sts, 2dc, dc. (30 sts)
R4: ch 2, slst in next st. * dc, slst. Repeat from * down the row.(30 sts)
R5: ch 2, 2dc, dc in each st until last 2 sts, 2dc, dc. (32 sts)
R6: ch 2, slst in next st. * dc, slst. Repeat from * down the row. (32 sts)
R7: ch 2, 2dc, dc in each st until last 2 sts, 2dc, dc. (34 sts)
R8: ch 2, slst in next st. * dc, slst. Repeat from * down the row. (34 sts)
R9: ch 2, 2dc, dc in each st until last 2 sts, 2dc, dc. (36 sts)
R10: ch 2, slst in next st. * dc, slst. Repeat from * down the row.(36 sts)
R11: ch 2, 2dc, dc in each st until last 2 sts, 2dc, dc. (38 sts)
R12: ch 2, slst in next st. * dc, slst. Repeat from * down the row. (38 sts)
R13: ch 2, 2dc, dc in each st until last 2 sts, 2dc, dc. (40 sts)
R14: ch 2, slst in next st. * dc, slst. Repeat from * down the row. (40 sts)
R15: ch 2, 2dc, dc in each st until last 2 sts, 2dc, dc. (42 sts)
R16: ch 2, slst in next st. * dc, slst. Repeat from * down the row. (42 sts)
R17: ch 2, 2dc, dc in each st until last 2 sts, 2dc, dc. (44 sts)
R18-20: ch 2, slst in next st. * dc, slst. Repeat from * down the row.(44 sts)
R21: ch 2, 2dc, dc in each st until last 2 sts, 2dc, dc. (46 sts)
R22-24: ch 2, slst in next st. * dc, slst. Repeat from * down the row.(46 sts)
R25: ch 2, 2dc, dc in each st until last 2 sts, 2dc, dc. (48 sts)
R26-28: ch 2, slst in next st. * dc, slst. Repeat from * down the row.(48 sts)
R29: ch 2, 2dc, dc in each st until last 2 sts, 2dc, dc. (50 sts)
R30-32: ch 2, slst in next st. * dc, slst. Repeat from * down the row.(50 sts)
R33: ch 2, 2dc, dc in each st until last 2 sts, 2dc, dc. (52 sts)
R34-36: ch 2, slst in next st. * dc, slst. Repeat from * down the row.(52 sts)
R37: ch 2, 2dc, dc in each st until last 2 sts, 2dc, dc. (54 sts)
R38-40: ch 2, slst in next st. * dc, slst. Repeat from * down the row.(54 sts)
R41: ch 2, 2dc, dc in each st until last 2 sts, 2dc, dc. (56 sts)
R42-44: ch 2, slst in next st. * dc, slst. Repeat from * down the row.(56 sts)
R45: ch 2, 2dc, dc in each st until last 2 sts, 2dc, dc. (58 sts)
R46-48: ch 2, slst in next st. * dc, slst. Repeat from * down the row.(58 sts)
R49: ch 2, 2dc, dc in each st until last 2 sts, 2dc, dc. (60 sts)
R50-51: ch 2, slst in next st. * dc, slst. Repeat from * down the row. (60 sts)
Fasten off with a tail a little over 2x the length of the last row
Back Strap
Begin with a long tail around 5”
Ch 4+2
R1: dc into 4th ch from the hook, dc in 2 ch. (4 sts)
R2: ch 1, dc, slst, dc.(4 sts)
R3: ch 2, dc in each st down the row. (4 sts)
R4-15 (15, 15, 17, 17)(19, 19, 19, 19): repeat R2 and R3 respectively
You can adjust the number of rows to control the gap in the back.
Fasten off with a 5” tail
Assembly
- 1. With RS facing you, align the middle of the top of your sleeve to the middle portion (shoulder) of the long body panel. Use a whip stitch with the long tail from your sleeve to attach the sleeve to the body panel. Repeat for both sleeves
- 2. Using the long tail from Panel 2, seam the panels together with a whip stitch in the front (longer portion).
- 3. Seam the bottom of the sleeves closed starting from the wrist to the armpit and down to the bottom of the garment
- Turn the garment inside out and follow the tutorial below for the tie effect:
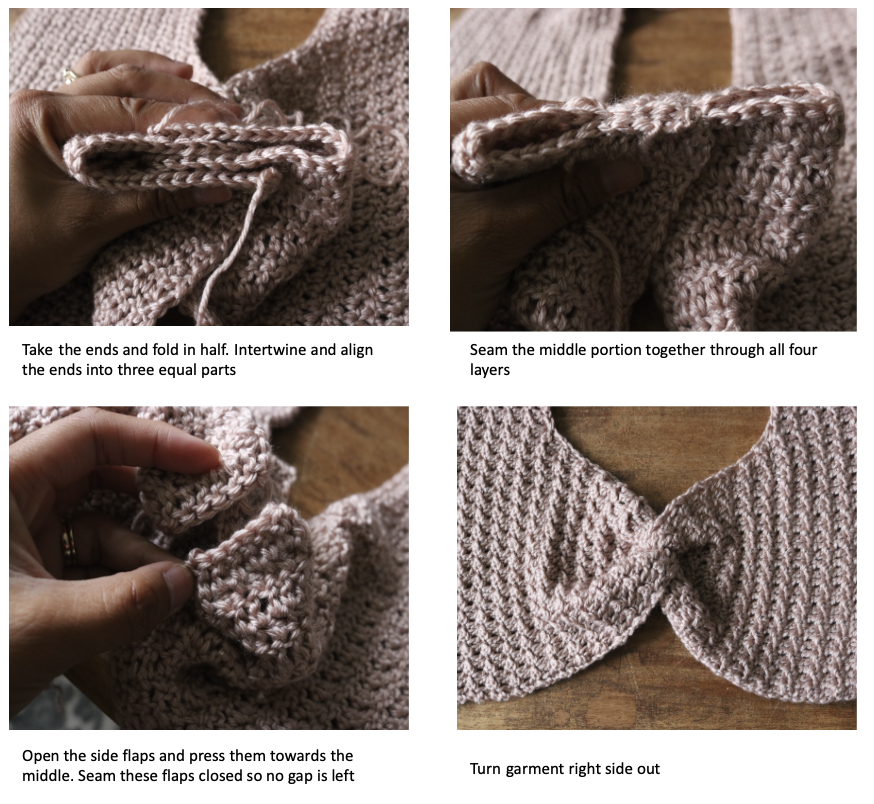
5. Using the tails of the back strap, seam the strap to the back edges. Attach across the back neck opening around 1-3 inches below midpoint of the garment
6. Weave in your ends and you are all done!
You now have a new open back crochet sweater!
Add this design to your crochet pattern stash and get the premium version now or the crochet kit here.
I would love to see how your style your Rutland Cardigan this fall. Make sure to tag me @knitsandknotsbyame on IG. Until next time, creatives!

Looking for more beautiful patterns? Make sure to check out all of my beginner friendly patterns here where you can find garments, amigurumi, and accessories.
That’s all for now my maker friend! Remember, never miss a stitch by subscribing to my newsletter. Happy crocheting!
xoxo
Abigail

5 Comments
Comments are closed.