Free Chunky Crochet Cardigan Pattern for Beginners
Hello my maker friend! It is time for another cozy crochet pattern and this time I have for you a free chunky crochet cardigan pattern that is great for beginners! Fall is among us and I am all for these cozy projects!
This post contains affiliate links. I get a small commission from any purchase made through these links at no additional cost to the buyer. This allows me to keep free awesome content coming your way. Check out my privacy policy for a full rundown of disclosures.
The Rutland cardigan comes in both a knit and crochet version. The knit version is a part of Lion Brand Yarn’s 2023 Countdown to Christmas which is a yearly campaign featuring curated designs one for each week counting down to Christmas.
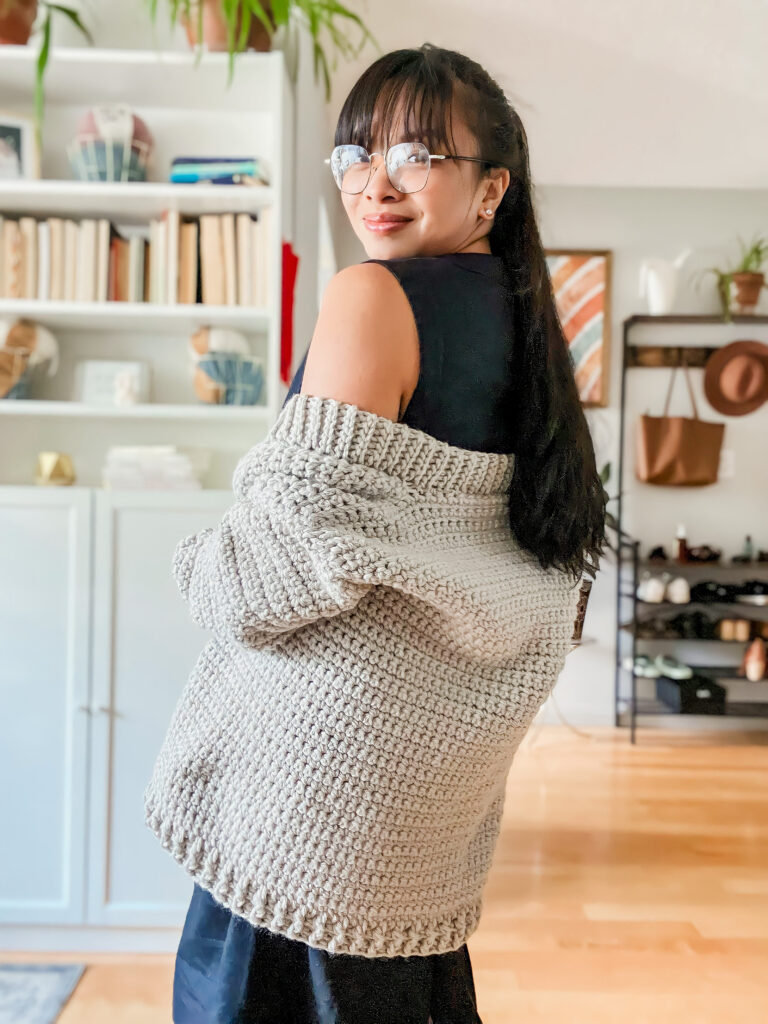
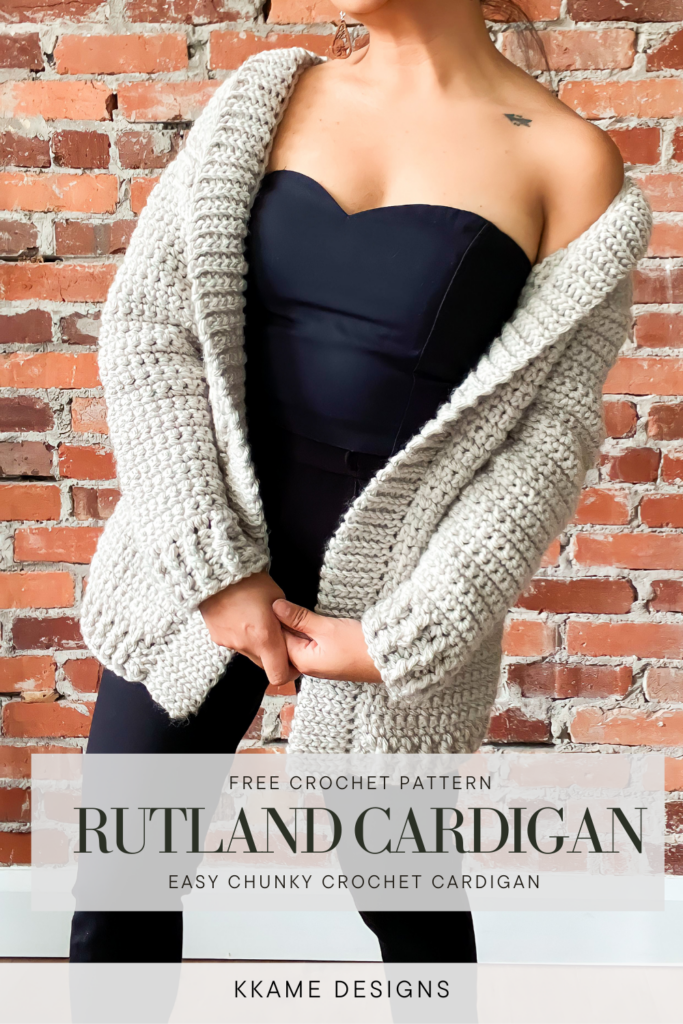
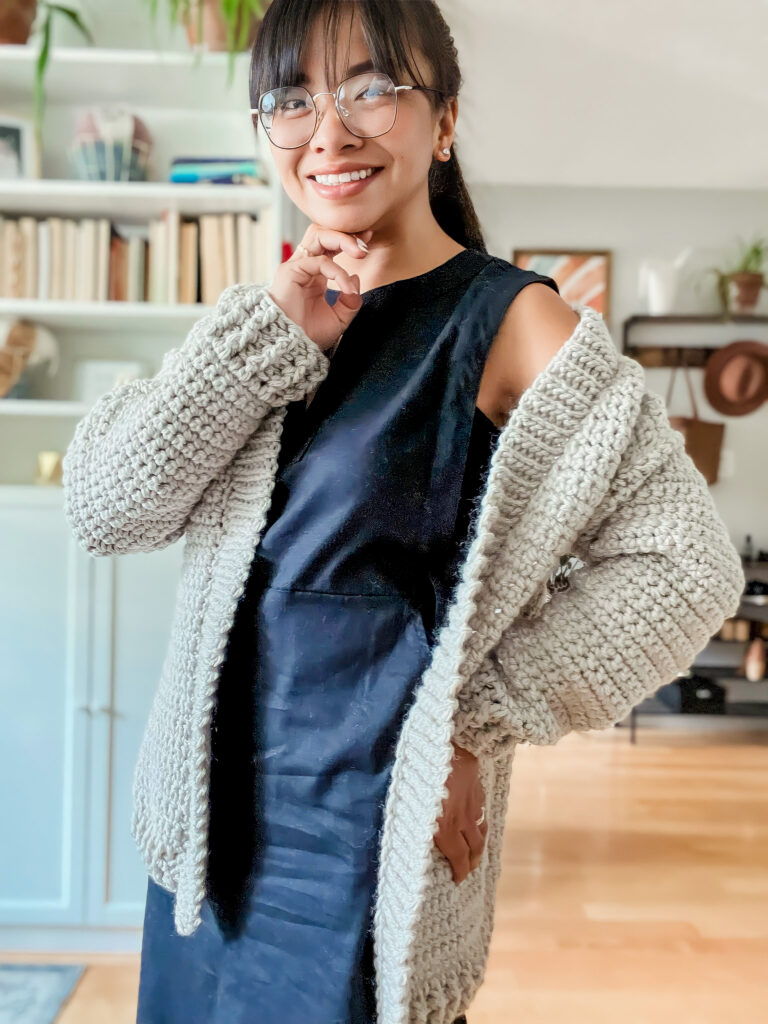
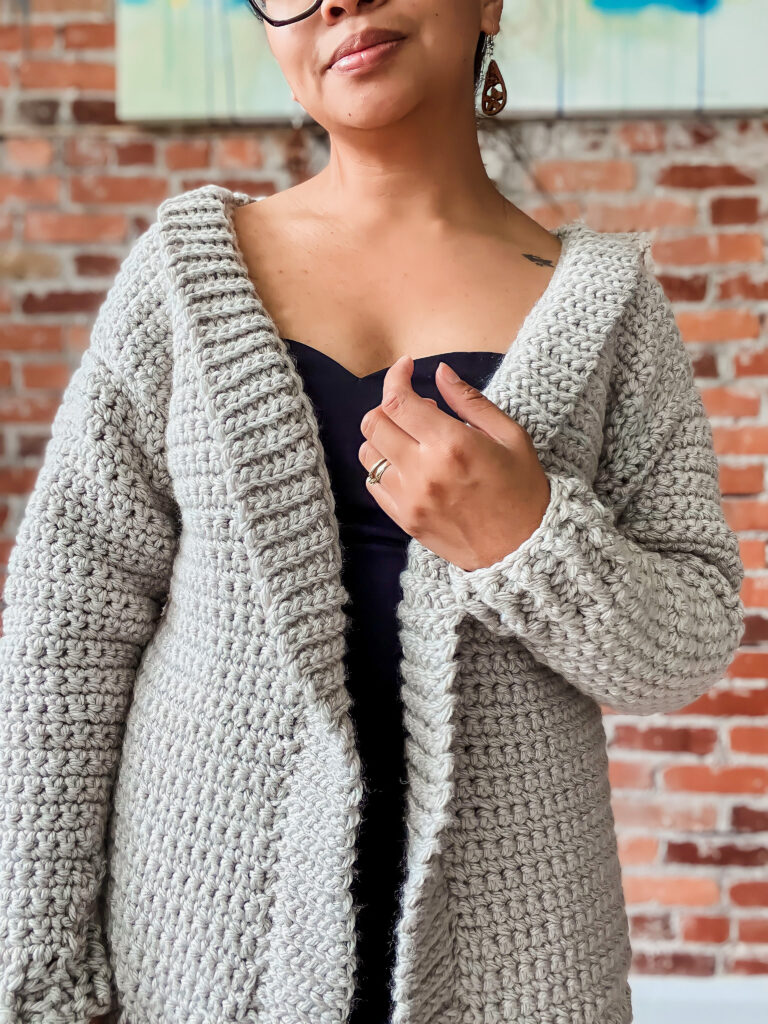
This cardigan features a simple single crochet stitch body, ribbing on the bottom and cuffs, with a knit look crochet stitch collar border around the front opening. The cardigan is made using an easy construction and just three separate pieces for minimal seaming.
Get the inexpensive ad-free pattern for this pattern here. The paid pattern includes step-by-step instructions and picture tutorials to help you with chunky knit cardigan.

About this chunky crochet cardigan
In my most for the Rutland Cardigan (knit version), I explained all about the inspiration for these cardigans.
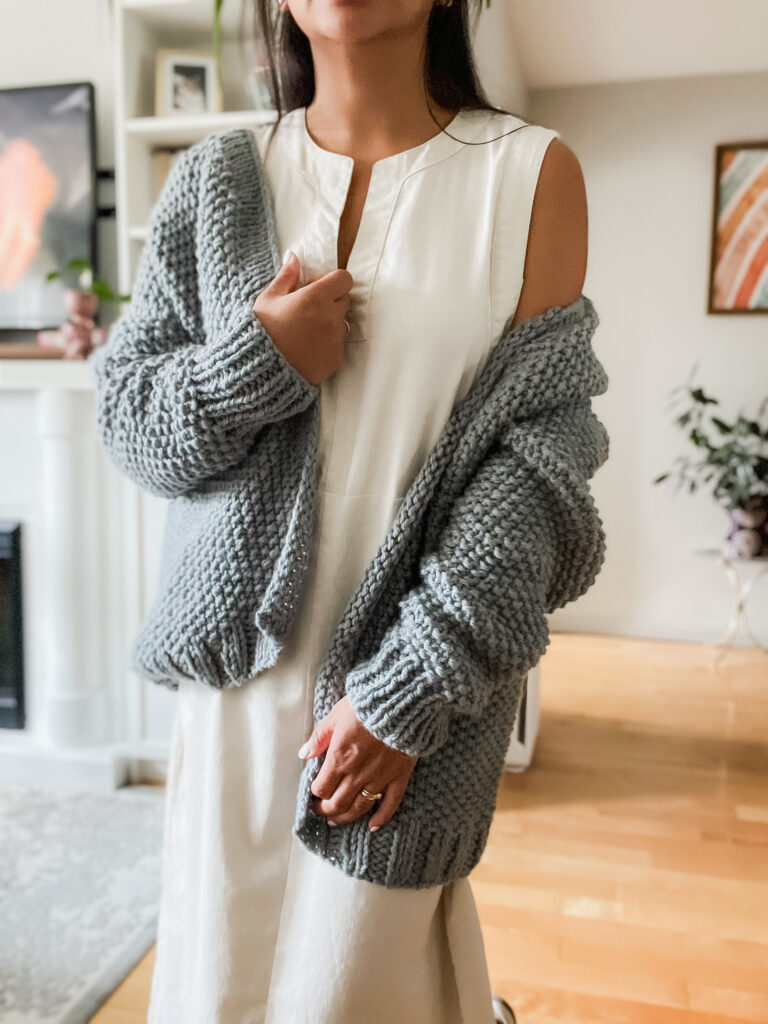
For this crochet version, I knew I wanted a cozy cardigan that beginner crocheters would be able to make and enjoy during the colder months. I envisioned an oversized cardigan that would be easy to pair with a variety of things so I chose to use a greyish color.
One great thing about this cardigan is it is also available as a kit on Lion Brand Yarn so you can customize it to be made in a variety of different colors.
The cardigan was very quick to make because of the simple stitches used. I did experiment with a variety of different stitches but settled on keeping it simple and using mainly single crochet stitches especially because we are using a bulky weight yarn. More about the yarn later though!
Construction of this chunky crochet cardigan
The crochet version of the Rutland Cardigan is made in four different parts: Body, 2 sleeves, and the collar/edging.
The body is made bottom up and then split into three sections for the armholes. This means that both the front panels and back panel are worked simultaneously. This method entails minimal shaping and minimal seaming which is always a great thing when making crochet garments.
Drop sleeve construction was used for this chunky knit cardigan making it beginner friendly and easy to follow and wear.
My favourite part of this chunky knit cardigan is the collar/edging. The band was made performing slip stitches in the front loop only creating a knit like fabric. It is also seamed very meticulously to create nice thick neckline ribbing that has a nice modern look. Learn more about this crochet stitch that looks knitted here.
This free crochet cardigan pattern makes. use od basic stitches all throughout making it a great crochet project for any skill level.
Related Post: Check out this curated list of sweater patterns to make this year
Want more fall designs?
Check out these patterns (left to right): Norquay Skirt and the Shu Poncho
Yarn
For this chunky crochet cardigan I used Lion Brand Yarn’s Hue + Me in the colorway Whisper.
I have the most amount of patterns in this yarn! Unlike other bulky yarns, Hue+Me works does not work up into a tight fabric. It actually has amazing drape and only gets softer after every wash.
To prove my point, I chose to use single crochet stitches for this cardigan. This creates a very tight and often stiff fabric especially when using bulky yarn. Not with Hue+Me, this yarn becomes flexible and drapes beautifully.
See all of my designs with this yarn below:
Free Easy Chunky Crochet Cardigan -Rutland Cardigan
First off, this is a free crochet pattern for the Rutland Cardigan (knit) for sizes S/M and L/XL. Due to the length of the pattern I have only included these sizes, the other sizes 2X-5X can be found in the premium ad-free pattern. The PDF pattern includes extra picture tutorials for visual learners too. This pattern is for personal use only.
Pattern notes:
- This pattern is made using US terms.
- The cardigan is made using drop sleeve construction, a part of the shoulder becomes a part of the sleeves.
- The beginning ch in each row counts as a st in the overall st count except in the collar.
- Shown in picture is size M worn by designer who is 5’2 and weighs 135 lbs. without any modifications done to the pattern.
Materials:
- CYC 5 Chunky Yarn
- 7.00 mm crochet hook
- Scissors
- Needle
- Stitch Markers (optional)
Gauge – Do not forget to make your gauge!
9 sts x 11 rows = 4” in single crochet (used for main body and sleeves)
12 sts x 16 rows = 4” of slst in back loops only for the collar
Abbreviations:
Ch – Chain
St/s – Stitch/es
Dc – double Crochet
Sc – Single crochet
FPdc – Front post double crochet
BPdc – Back post double crochet
Sizes and finished measurements
| Size | Width | Length | Center back to Wrist |
| S/M | 20 | 24 | 28 |
| L/XL | 24 | 25 | 29 |
| 2X/3X | 28 | 25 | 31 |
| 4X/5X | 32 | 26 | 32 |
Let’s start making your chunky cardigan
Body of the cardigan
Chain on 81 (99, 117, 135) +2
Bottom Ribbing:
R1: dc into 4th ch from the hook (counts as your first and second st), dc in each ch st until end of the row. (81, 99, 117, 135 sts)
2-3: ch 2, *FPdc, BPdc. Repeat from * until the last st. Dc into last st. (81, 99, 117, 135 sts)
Body
R4 – 41 (41, 38, 38): ch 1, sc into next st. sc into each st down the row. (81, 99, 117, 135 sts)
You are now going to start working in sections. These sections are the right front panel, back, and the left front panel.
First section (note: shaping is done on the outer sides)
S/M Only
R42: ch 1, sc into next st. sc into next 17 sts. (18 sts)
R43: ch 1, sc into next st. sc into each st down the row. (18 sts)
R44: sc2tog, sc into each st down the row. (17 sts)
R45: ch 1, sc into next st. sc into each st down the row. (17 sts)
R46: sc2tog, sc into each st down the row. (16 sts)
R47: ch 1, sc into next st. sc into each st down the row. (16 sts)
R48: sc2tog, sc into each st down the row. (15 sts)
R49: ch 1, sc into next st. sc into each st down the row. (15 sts)
R50: sc2tog, sc into each st down the row. (14 sts)
R51: ch 1, sc into next st. sc into each st down the row. (14 sts)
R52: sc2tog, sc into each st down the row. (13 sts)
R53-63: ch 1, sc into next st. sc into each st down the row. (13 sts)
Fasten off with a long tail
L/XL Only
R42-45: ch 1, sc into next st. sc into next 22 sts. (23 sts)
R46: sc2tog, sc into each st down the row. (22 sts)
R47: ch 1, sc into next st. sc into each st down the row. (22 sts)
R48: sc2tog, sc into each st down the row. (21 sts)
R49: ch 1, sc into next st. sc into each st down the row. (21 sts)
R50: sc2tog, sc into each st down the row. (20 sts)
R51: ch 1, sc into next st. sc into each st down the row. (20 sts)
R52: sc2tog, sc into each st down the row. (19 sts)
R53: ch 1, sc into next st. sc into each st down the row. (19 sts)
R54: sc2tog, sc into each st down the row. (18 sts)
R55-66: ch 1, sc into next st. sc into each st down the row. (18 sts)
Fasten off with a long tail
Middle Section
(attach yarn to the next portion, the section you just finished is sitting on the right side of you)
R42 (42, 39, 39): ch1 to secure attached yarn and sc into same space (counts as one st only). Sc into next 44 (53, 62, 71) sts. (45, 54, 63, 72 sts)
R43 (43, 40, 40) – 63 (66, 66, 68): ch 1 (counts as first st), sc in each st down the row. (45, 54, 63, 72 sts)
Fasten off
Third Section
S/M Only
R42: ch 1, sc into next st. sc into each st down the row. (18 sts)
R43: ch 1, sc into next st. sc into each st down the row. (18 sts)
R44: ch 1, sc into next st. sc into each st down the row until last 2 sts, sc2tog. (17 sts)
R45: ch 1, sc into next st. sc into each st down the row. (17 sts)
R46: ch 1, sc into next st. sc into each st down the row until last 2 sts, sc2tog. (16 sts)
R47: ch 1, sc into next st. sc into each st down the row. (16 sts)
R48: ch 1, sc into next st. sc into each st down the row until last 2 sts, sc2tog. (15 sts)
R49: ch 1, sc into next st. sc into each st down the row. (15 sts)
R50: ch 1, sc into next st. sc into each st down the row until last 2 sts, sc2tog. (14 sts)
R51: ch 1, sc into next st. sc into each st down the row. (14 sts)
R52: ch 1, sc into next st. sc into each st down the row until last 2 sts, sc2tog. (13 sts)
R53-63: ch 1, sc into next st. sc into each st down the row. (13 sts)
Fasten off with a long tail
L/XL Only
R42-45: ch 1, sc into next st. sc into next 22 sts. (23 sts)
R46: ch 1, sc into next st. sc into each st down the row until last 2 sts, sc2tog. (22 sts)
R47: ch 1, sc into next st. sc into each st down the row. (22 sts)
R48: ch 1, sc into next st. sc into each st down the row until last 2 sts, sc2tog. (21 sts)
R49: ch 1, sc into next st. sc into each st down the row. (21 sts)
R50: ch 1, sc into next st. sc into each st down the row until last 2 sts, sc2tog. (20 sts)
R51: ch 1, sc into next st. sc into each st down the row. (20 sts)
R52: ch 1, sc into next st. sc into each st down the row until last 2 sts, sc2tog. (19 sts)
R53: ch 1, sc into next st. sc into each st down the row. (19 sts)
R54: ch 1, sc into next st. sc into each st down the row until last 2 sts, sc2tog. (18 sts)
R55-66: ch 1, sc into next st. sc into each st down the row. (18 sts)
Fasten off with a long tail
Sleeves (make 2)
S/M
Ch 36 + 1
R1: sc into the 3rd ch from the hook (counts as your first 2 sts), sc into each st down the row. (36 sts)
R2-3: ch 1, sc into next st and in each st down the row. (36 sts)
R4: ch 1, sc2tog, sc in each st until last 3 sts, sc2tog, sc into last st. (34 sts)
R5-8: ch 1, sc into next st and in each st down the row. (34 sts)
R9: ch 1, sc2tog, sc in each st until last 3 sts, sc2tog, sc into last st. (32 sts)
R10-13: ch 1, sc into next st and in each st down the row. (32 sts)
R14: ch 1, sc2tog, sc in each st until last 3 sts, sc2tog, sc into last st. (30 sts)
R15-18: ch 1, sc into next st and in each st down the row. (30 sts)
R19: ch 1, sc2tog, sc in each st until last 3 sts, sc2tog, sc into last st. (28 sts)
R20-23: ch 1, sc into next st and in each st down the row. (28 sts)
R24: ch 1, sc2tog, sc in each st until last 3 sts, sc2tog, sc into last st. (26 sts)
R25-28: ch 1, sc into next st and in each st down the row. (26 sts)
R29: ch 1, sc2tog, sc in each st until last 3 sts, sc2tog, sc into last st. (24 sts)
R30-33: ch 1, sc into next st and in each st down the row. (24 sts)
R34: ch 1, sc2tog, sc in each st until last 3 sts, sc2tog, sc into last st. (22 sts)
R35-38: ch 1, sc into next st and in each st down the row. (22 sts)
R39: ch 1, sc2tog, sc in each st until last 3 sts, sc2tog, sc into last st. (20 sts)
R40-41: ch 1, sc into next st and in each st down the row. (20 sts)
R42: ch 2, dc into next st and in each st down the row. (20 sts)
R43-45: ch 2, ch 2, *FPdc, BPdc. Repeat from * until the last st. Dc into last st. (20 sts)
Fasten off
L/XL
Ch 40 + 1
R1: sc into the 3rd ch from the hook (counts as your first 2 sts), sc into each st down the row. (40 sts)
R2-4: ch 1, sc into next st and in each st down the row. (40 sts)
R5: ch 1, sc2tog, sc in each st until last 3 sts, sc2tog, sc into last st. (38 sts)
R6-8: ch 1, sc into next st and in each st down the row. (38 sts)
R9: ch 1, sc2tog, sc in each st until last 3 sts, sc2tog, sc into last st. (36 sts)
R10-12: ch 1, sc into next st and in each st down the row. (36 sts)
R13: ch 1, sc2tog, sc in each st until last 3 sts, sc2tog, sc into last st. (34 sts)
R14-16: ch 1, sc into next st and in each st down the row. (34 sts)
R17: ch 1, sc2tog, sc in each st until last 3 sts, sc2tog, sc into last st. (32 sts)
R18-20: ch 1, sc into next st and in each st down the row. (32 sts)
R21: ch 1, sc2tog, sc in each st until last 3 sts, sc2tog, sc into last st. (30 sts)
R22-24: ch 1, sc into next st and in each st down the row. (30 sts)
R25: ch 1, sc2tog, sc in each st until last 3 sts, sc2tog, sc into last st. (28 sts)
R26-28: ch 1, sc into next st and in each st down the row. (28 sts)
R29: ch 1, sc2tog, sc in each st until last 3 sts, sc2tog, sc into last st. (26 sts)
R30-32: ch 1, sc into next st and in each st down the row. (26 sts)
R33: ch 1, sc2tog, sc in each st until last 3 sts, sc2tog, sc into last st. (24 sts)
R34-36: ch 1, sc into next st and in each st down the row. (24 sts)
R37: ch 1, sc2tog, sc in each st until last 3 sts, sc2tog, sc into last st. (22 sts)
R38-39: ch 1, sc into next st and in each st down the row. (22 sts)
R40: ch 2, dc into next st and in each st down the row. (22 sts)
R41-43: ch 2, ch 2, *FPdc, BPdc. Repeat from * until the last st. Dc into last st. (22 sts)
Fasten off
Assembly
Place your garment wrong side facing you and fold the first section over the middle section lining the armhole.
Using the long tail, attach a tapestry needle and use a whip st to seam the shoulder closed across the same amount of sts.
Repeat on the opposite side, folding the third section over the middle section.
Collar
For the collar you are going to make a band of slst in the back loop only for a width of 6 sts
Ch 6 +1
R1: sc into the 3rd ch from the hook. Slst in each ch down the row (6 slst)
R2 – 219(227, 229, 236): ch 1 (is not counted as a st.), slst in back loop only in each st down the row. (6 slst per row).
Do not fasten off.
Note: this computation has an extra inch in length due to natural drape and stretch of the garment. If you feel like you need more or less rows, you can adjust accordingly.
Attaching the collar to the garment
Align the collar to the garment as shown in the diagram below:
Pull the working loop on hook through the bottom stitch of the garment.
Flip the collar so that right sides are facing together.
use a single crochet stitch to attach the collar to the garment around the mid opening.
Attaching the Sleeves
Align the sleeves in place around the armhole with the opening facing downwards.
Seam the sleeves to the armhole using a whip stitch and then seam the bottom of the sleeves closed.
Weave in your ends and you are all done!
You now have a new chunky crochet cardigan!
Add this design to your crochet pattern stash and get the premium version now.
I would love to see how your style your Rutland Cardigan this fall. Make sure to tag me @knitsandknotsbyame on IG. Until next time, creatives!
Looking for more beautiful patterns? Make sure to check out all of my beginner friendly patterns here where you can find garments, amigurumi, and accessories.
That’s all for now my maker friend! Remember, never miss a stitch by subscribing to my newsletter. Happy crocheting!
xoxo
Abigail

2 Comments
Comments are closed.