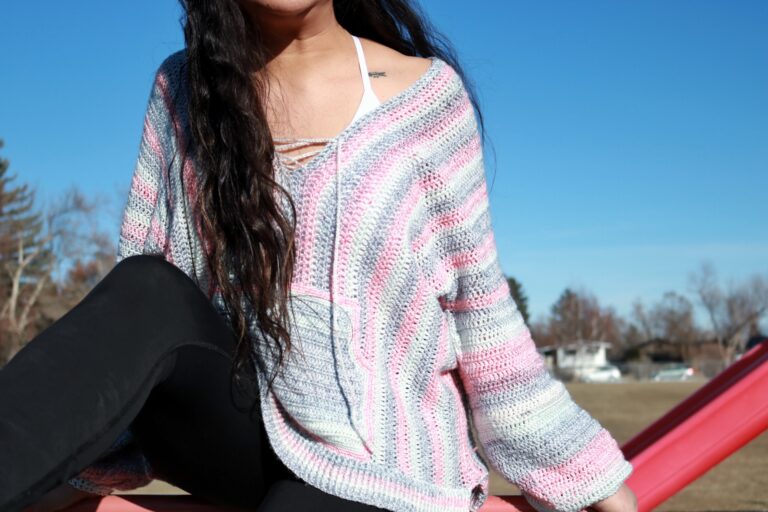
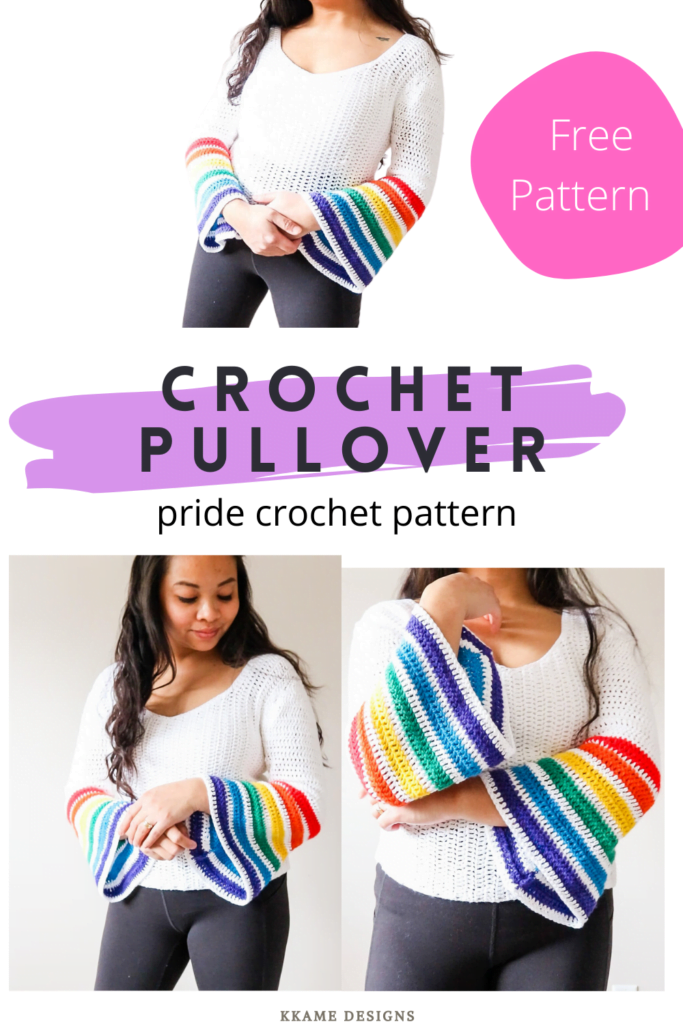
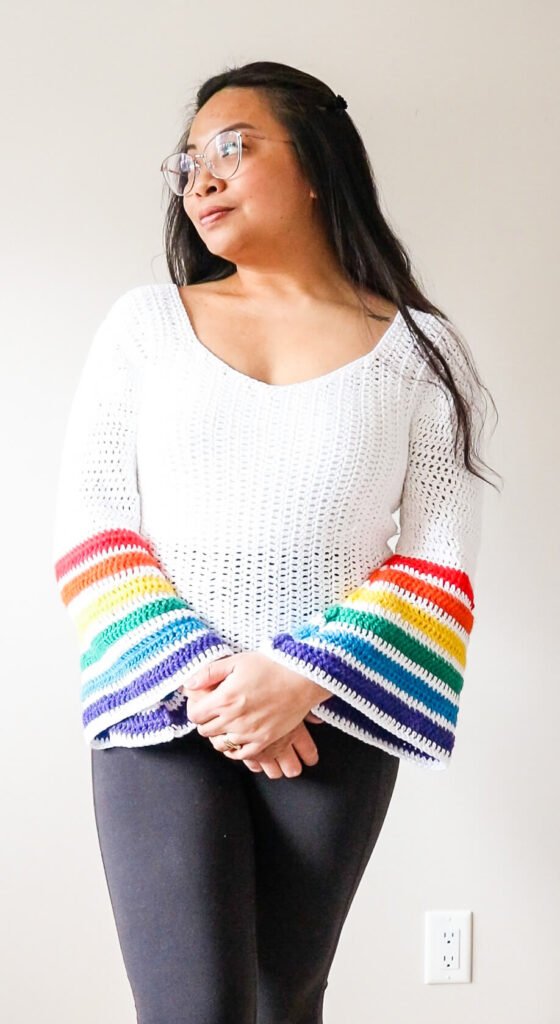
How to Make a Crochet Pullover with Rainbow Stripes
This post show you how to make crochet pullover with rainbow stripes that is great for transition months. This pattern uses lightweight yarn, easy stitches, and features angel sleeves.
Get the inexpensive ad-free pattern for this Nooeh Pullover Pattern. Print and add to your crochet pattern collection now. See more free sweater patterns here.
Related: How To Crochet a Bell Sleeved Pullover with Lace
This post may contain affiliate links. I get a small commission from any purchase made through these links at no expense to the buyer. This allows me to keep free awesome content coming your way. Check out my privacy policy for a full rundown of disclosures.
Inspiration behind the Nooeh Pullover
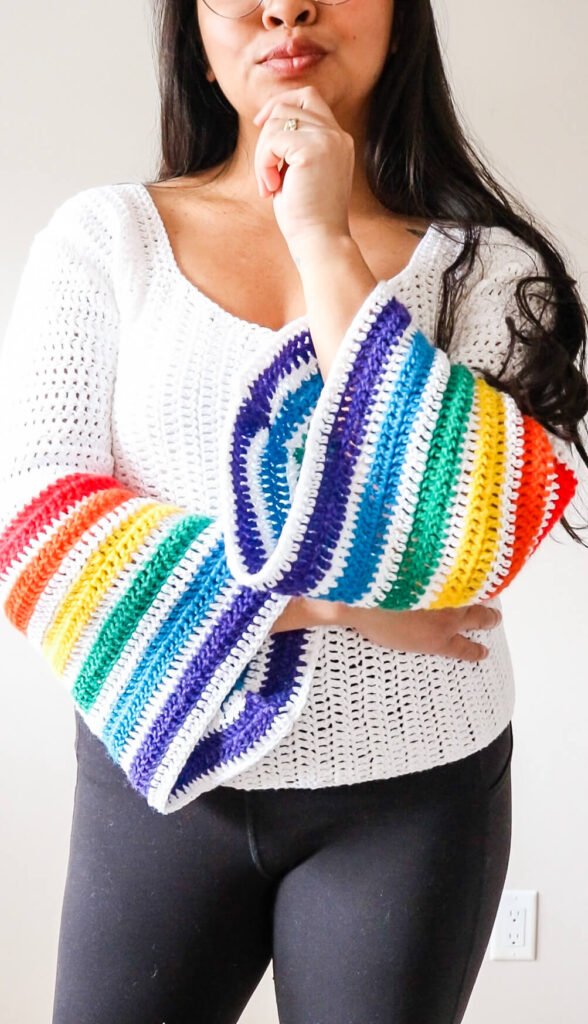
The Nooeh Pullover is a crochet top made to celebrate pride month with it’s simple construction highlighting the rainbow striped sleeves.
The name Nooeh is derived by the Hawaiian word for rainbow “anuenue”. This seemed fitting – especially since I have been missing home so much – because Hawaii is known as the Rainbow state. I loved driving home after work and seeing rainbow after rainbow.
I am still in an obsession for these bell retro style sleeves after making the Louis Belle Pullover. And to be honest, you can probably expect even more from me! Haha I love how playful these sleeves are, how they move, and elevate the simplest of designs.
Design Details
The Nooeh Pullover is a crochet pullover with rainbow stripes. The construction of this sweater is simple using a side-to-side techniques and simple stitches, making it a great beginner friendly crochet pattern.
The pullover is made to be more on the fitted side with around 2″ of positive ease depending on the body. This gives even more highlight to the crocheted rainbow stripes.
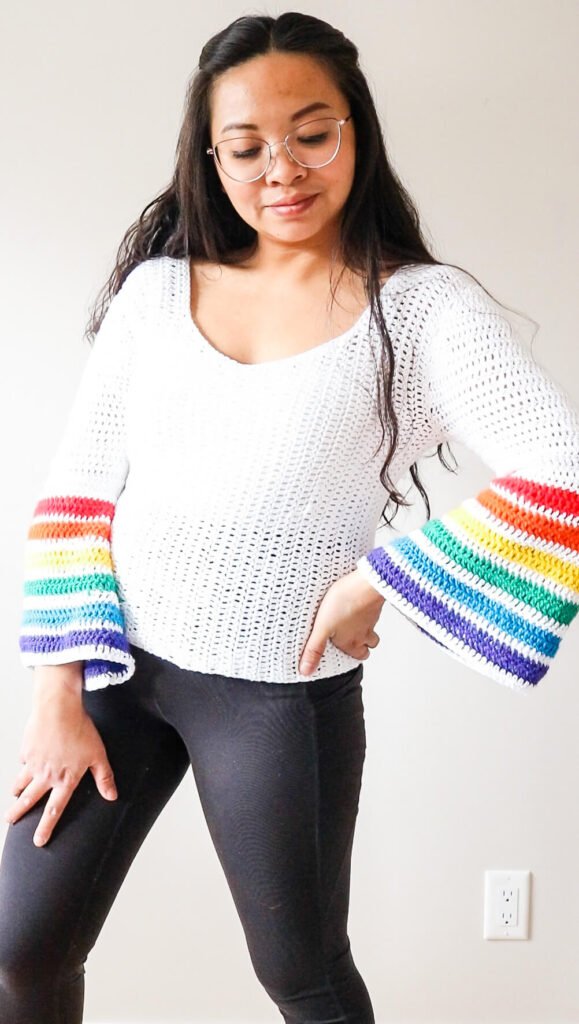
How to Style a Crocheted Pullover with Rainbow Stripes
This fun top goes great with summer shorts/pants and a cute footwear. The rainbow stripes make the top easy to style with different accessories. It is so versatile, the options for pairing are endless.
Crocheted pullovers are a bit different because of the stitches create spaces where air can pass through. The winter air could get a bit cold for our tummies so I suggest wearing a camisole inside.
I got a pack of 3 (or was it 4?hmm) simple black and white camisoles from our local Costco for under $20. I use these under crocheted sweaters. Stores like H&M also have really cheap spaghetti strap camisoles for under $10.
See more crochet sweater patterns in this list I curated filled with trendy and FREE patterns:
Yarn Used for this oversized crochet sweater
For this design, I used Lion Brand Yarn’s Coboo for the body and Lion Brand Yarn’s Mandala Baby for the stripes.
Coboo is a 100% cotton yarn which is very light to touch. It is similar to Comfy Cotton. This makes is feel so nice on the body. Mandala Baby is an acrylic yarn which has a fuzzier texture. Since this is used only on the flared portion of the sleeves, the texture does not really bother me.
For the stripes, I prepared the yarn by separating the cake into it’s different colors.
For this pattern, any cyc 3 yarn would do great! just make sure to make a gauge to make sure you get the right measurements/results.
Do you have the right yarn for this project? Make sure to check out my post Best Yarn for Crochet Sweaters to help you choose the perfect yarn for this design.
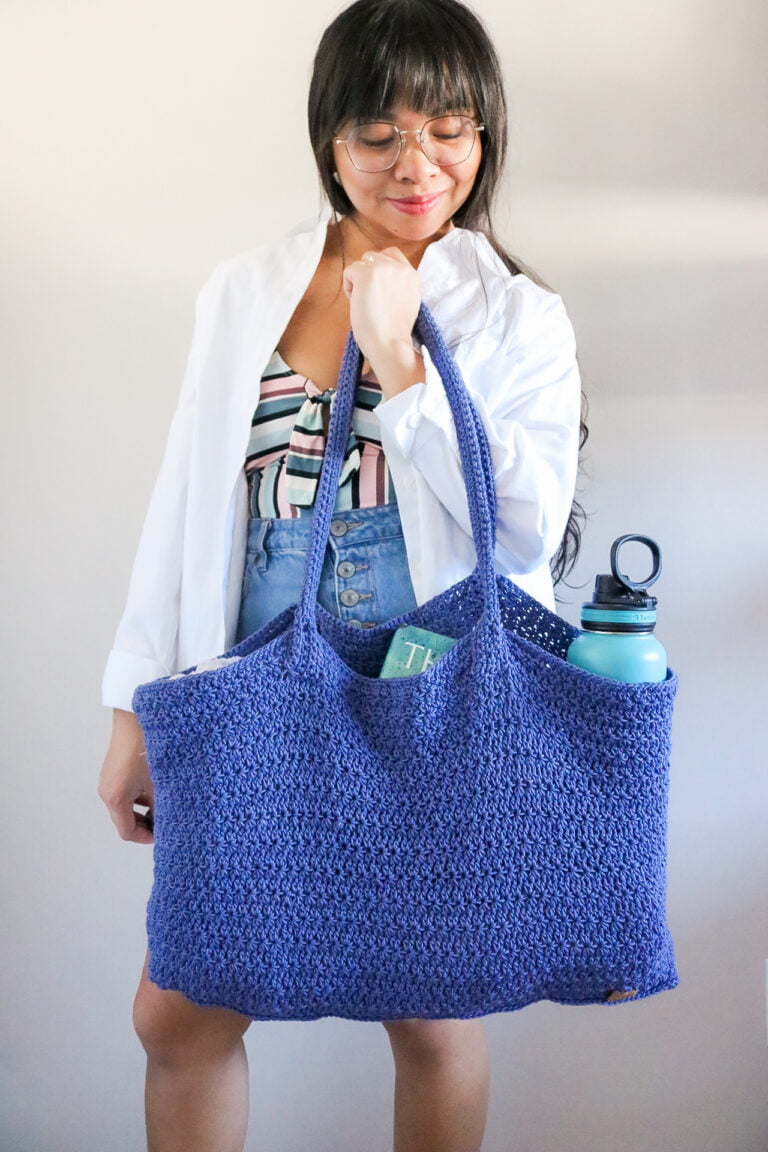
Oversized Crochet Sweater Pattern: The Wanderlust Sweater
This post contains the free crochet pattern for the Nooeh Pullover in size Medium. The pattern is written separately for all the different sizes because of the side-to-side construction and differences. You can find the other sizes (XS-XL) in this ad-free PDF version here for a low costs.
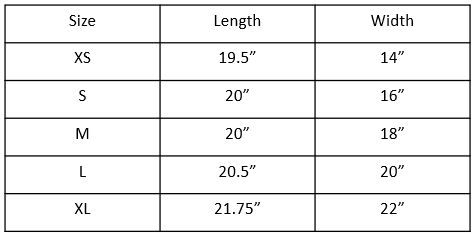
Sizes – This free pattern is for Size M. See the table below for other sizes available in the PDF version
Materials:
*based on size respectively
- CYC 3 Yarn – check out my post Best Yarn for Crochet Sweaters to find the right yarn for you
- Mandala Baby Rainbow Falls(1 ball)
- 4.0mm crochet Hook
- Scissors
- Needle
Gauge – 4”x4” = 16sts x 8 rows of double crochet crochet
Abbreviations (US Terms)
- Ch – chain
- Sc – single crochet
- Dc – double crochet
- Fdc – foundation double crochet
- Dc2tog – double crochet two sts together
- Sc3tog – single crochet 3 sts together
- Inc – increase (2double crochets in one st)
- St/s – stitch/es
Pattern Notes
- This pattern is made using US terminology.
- The pattern is written in rows. Turn after each row.
- The ch 2 at the beginning of the row is counted as a stitch in the final count.
- The body is worked in one single piece (except XS which is working in two panels) side to side and seamed along the shoulders and one side.
- Separate the colors in the mandala cake for the striped color portion of the sleeves
Crochet Pattern
Are you a visual learner? You can get the PDF pattern at low cost here on the site (cheapest option).
Body
Ch 80+ 2
R1: dc into 4th ch from the hook, dc into each ch down the row (80 sts)
R2-8: ch 2, dc into each st down the row (80 sts)
You are now going to work on the neckline
R9: ch 2, dc into next 57 sts. (58 sts)
R10: dc2tog, dc each st until end of the row (57 sts)
R11: ch 2, dc in each st until last 2 sts, dc2tog (56 sts)
R12: dc2tog, dc each st until end of the row (55 sts)
R13: ch 2, dc in each st until last 2 sts, dc2tog (54 sts)
R14: dc2tog, dc each st until end of the row (53 sts)
R15: ch 2 , dc in each st until last 2 sts, dc2tog (52 sts)
R16: dc2tog, dc each st until end of the row (51 sts)
R17: ch 2, dc until end of the row (51 sts)
R18: inc, dc until end of the row (52 sts)
R19: ch 2, dc in each st until last st, inc (53 sts)
R20: inc, dc until end of the row (54 sts)
R21: ch 2, dc in each st until last st, inc (55 sts)
R22: inc, dc until end of the row (56 sts)
R23: ch 2, dc in each st until last st, inc (57 sts)
R24: inc, dc until end of the row (58 sts)
You are now going to work back up to the shoulder
R25: ch 2, dc in each st until end or the row, 21 Fdc. (80 sts)
R26-32: ch 2, dc into each st until end of the row (80 sts)
You are now shaping the bottom of the armhole
R33: ch 2, dc into next 47 sts. (48 sts)
R34: dc2tog, dc into each st down the row (47 sts)
R35: ch 2, dc into each st until last 2 sts, inc, inc (49 sts)
R36: inc, inc, dc into each st until the end of the row (51 sts)
You are now going to work your way up to the back shoulder
R37: ch 2, dc into each st until end of the row, 28Fdc. (80 sts)
R38-44: ch 2, dc into each st until the end of the row (80 sts)
You are now shaping the back neckline
R45: ch 2, dc into each st until last 6 sts, dc2tog dc2tog, dc2tog (77 sts)
R46: dc2tog, dc2tog, dc into each st until end of the row (75 sts)
R47: ch 2, dc into each st until last 2 sts, dc2tog (74 sts)
R48-57: ch 2, dc into each st until the end of the row (74 sts)
R58: inc, dc into each st down the row (75 sts)
R59: ch 2, dc into each st until last 2 sts, inc, inc (77 sts)
R60: inc, inc, inc, dc into each st until end of the row (80 sts)
You are now working on the back shoulder
R61-68: ch 2, dc into each st until end of the row. (80 sts)
You are now working on the bottom of the second armhole
R69: ch 2, dc into next 50 sts (51 sts)
R70: dc2otg, dc2tog, dc into each st down the row (49 sts)
R71: ch 2, dc into each st until last 2 sts, dc2tog, dc2tog (47 sts)
R72: inc, dc into each st down the row . (48 sts)
Fold your piece so the right side is inside. Use a stitch marker to mark 48 sts along the first row and align with the last row. Use a slst to seam the sides together. Fasten off
Flip garment so that the right side is out. Attach yarn to the shoulder and seam the front and back shoulder flaps together using a whip st.
Sleeve
This pattern requires you to change colors. See my post about how to seamlessly change colors in crochet to get that flawless transition.
Ch 16
R1: inc, inc, dc in each ch until last 2 ch, inc, inc. (20 sts)
R2: inc, inc, dc in each st until last 2 sts, inc, inc. (24 sts)
R3: inc, inc, dc in each st until last 2 sts, inc, inc. (28 sts)
R4: inc, inc, dc in each st until last 2 sts, inc, inc. (32 sts)
R5: inc, inc, dc in each st until last 2 sts, inc, inc. (36 sts)
R6: inc, inc, dc in each st until last 2 sts, inc, inc. (40 sts)
R7: inc, inc, dc in each st until last 2 sts, inc, inc. (44 sts)
R8: inc, inc, dc in each st until last 2 sts, inc, inc. (48 sts)
R9-26: ch 2, dc int each st until end of the row. (48 sts)
C
You are now going to start the rainbow striped portion and flare.
Red
R27: inc, dc in each st until last st, inc (50 sts)
R28: inc, dc in each st until last st, inc (52 sts)
White
R29: inc, dc in each st until last st, inc (54 sts)
Orange
R30: inc, dc in each st until last st, inc (56 sts)
R31: inc, dc in each st until last st, inc (58 sts)
White
R32: inc, dc in each st until last st, inc (60 sts)
Yellow
R33: inc, dc in each st until last st, inc (62 sts)
R34: inc, dc in each st until last st, inc (64 sts)
White
R35: inc, dc in each st until last st, inc (66 sts)
Green
R36: inc, dc in each st until last st, inc (68 sts)
R37: inc, dc in each st until last st, inc (70 sts)
White
R38: inc, dc in each st until last st, inc (72 sts)
Blue
R39: inc, dc in each st until last st, inc (74 sts)
R40: inc, dc in each st until last st, inc (76 sts)
White
R41: inc, dc in each st until last st, inc (78 sts)
Purple
R42: inc, dc in each st until last st, inc (80 sts)
R43:ch 2, dc int each st until end of the row. (80 sts)
White
R44: ch 2, dc int each st until end of the row. (80 sts)
Assembly
- Locate the middle of the top of the sleeve and align with where you seamed the shoulder. Place a stitch marker to hold the two places together.
- Count 8 stitches from the shoulder seam (left side) and use a stitch marker to align it with the first ch on the top of the sleeve.
- Count 8 stitches from the shoulder seam (right side) and use a stitch marker to align it with the last ch of the top of the sleeve.
- Seam around the armhole opening making sure to align the sleeve to the armhole.
- Seam from the bottom of the armhole down to the wrist.
Fasten Off and weave in ends.
Neckline
Attach yarn to the back of the neckline. Mark the middle portion of the front neckline with a stitch marker (this is between 16 and 17th rows for Medium).
Sc crochet all around neckline area, sc2tog where the stitch marker is placed to form a V in the neckline. Slst to end the row, fasten off and weave in end.
You now have a new crochet pullover with rainbow stripes!
Looking for more patterns? Make sure to check out all of my beginner friendly patterns here where you can find garments, amigurumi, and accessories.
Want more crochet sweater patterns?
That’s all for now my maker friend! Remember, never miss a stitch by subscribing to my newsletter. See you next time!
xoxo
Abigail